
User Interface Basics
Selecting Objects in the 3D View#
Most preset editing in Anukari begins with selecting the physics objects that you wish to edit in the 3D view. This can be done by clicking on an individual object or by using the left mouse button to drag a box and select multiple objects:
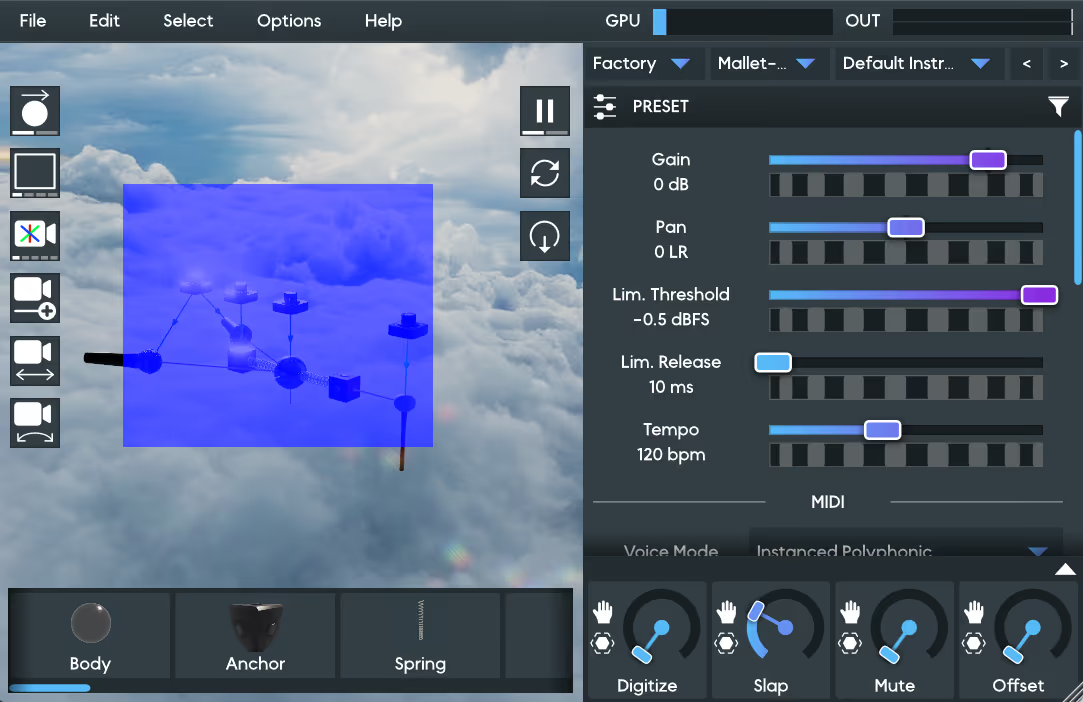
The panel on the right side of Anukari's display will automatically show the parameters that can be edited for the objects that are currently selected. Parameters are grouped by each type of entity that is selected. For example, in the screenshot below, the selection consists of two Anchor objects and one Body object, and the parameters for each type of object are shown in panels "1" and "2".
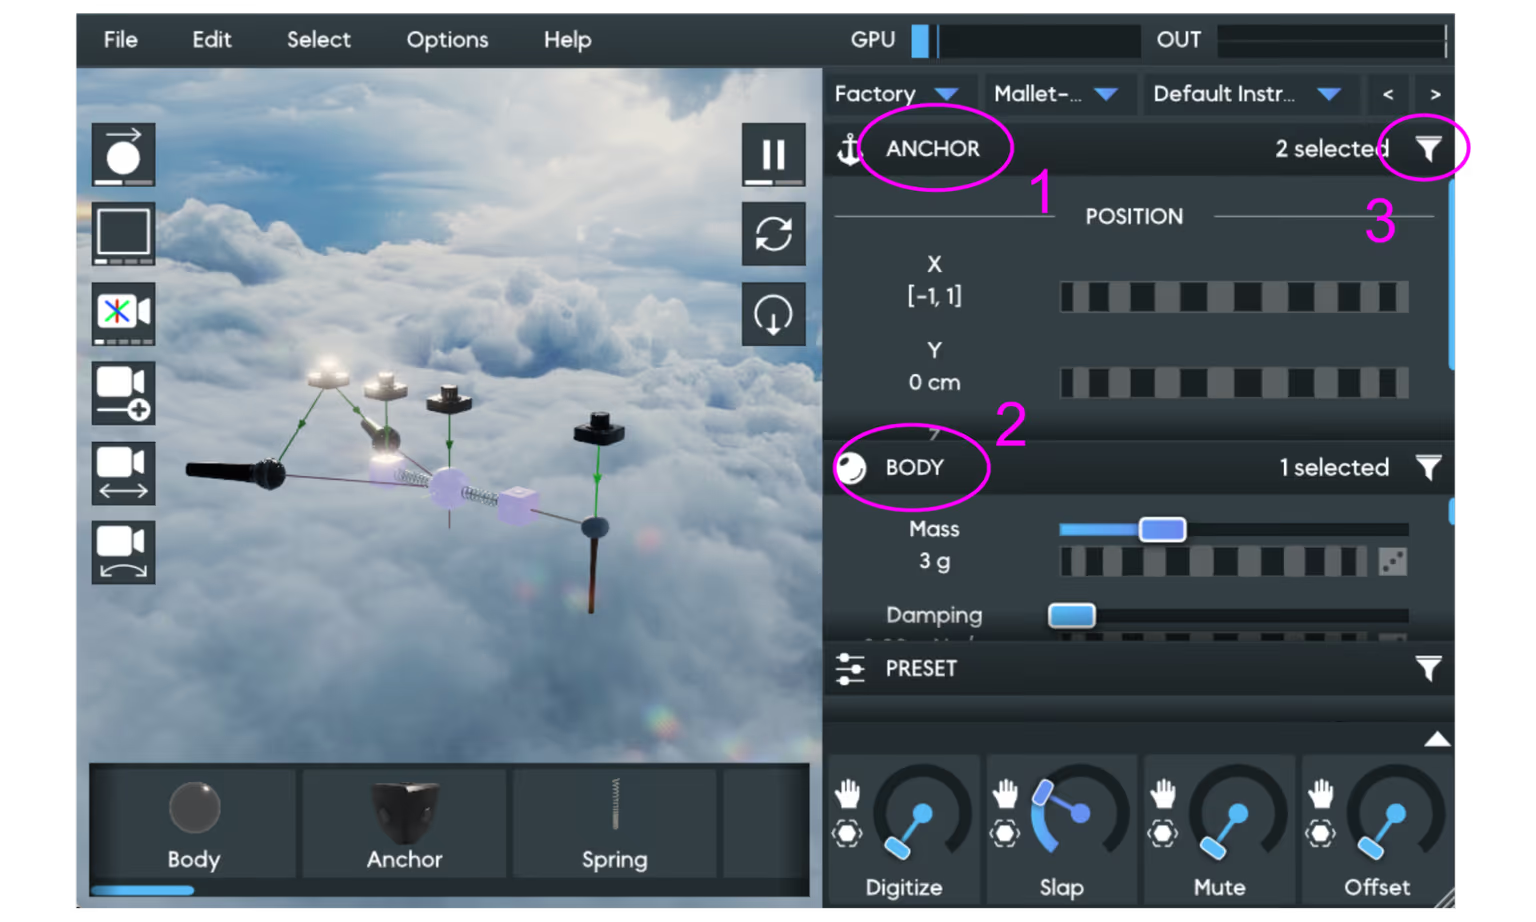
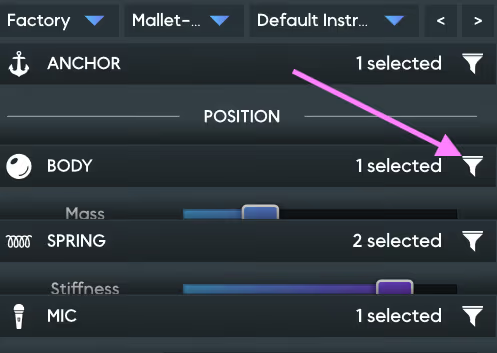
The Object Editor panels can be resized by dragging their headers up and down with the mouse. Double-clicking a header will maximize its size. Finally, clicking the Filter button (labeled "3" in the diagram) will filter the selection to only the given type of object.
Adding to and Removing from the Selection#
You can add or remove objects from the current selection by holding down specific keys while clicking an object or dragging a box:
- Hold Shift + click object: Add a single object to the selection.
- Hold Shift + drag a box: Add multiple objects to the selection.
- Hold Ctrl (Windows) or ⌘ (Mac) + click object: Remove a single object from the selection.
- Hold Ctrl (Windows) or ⌘ (Mac) + drag a box: Remove multiple objects from the selection.
Selecting Small or Buried Objects#
In a complex preset, small bodies or objects that are buried underneath many other objects can be difficult to click on precisely in order to add them to the selection.
Here are some techniques:
- Box selection: Click and drag an empty area of the 3D viewport to draw a selection rectangle. Any entities within the rectangle will be selected. This is often easier than trying to click directly on a tiny object.
- Zoom in: Scroll to zoom the camera closer to the area of interest. When objects are larger on screen, they are easier to click.
- Hide links: Use View > Show all links (Ctrl+L) to hide the visual clutter of connection lines, making it easier to see and click on the underlying entities.
Connecting Objects#
In Anukari, objects can only interact if they are connected with a link. There are several kinds of links, including:
In the real world, simply pointing a mic at an object will allow it to pick up sound from that object. But in Anukari, Mic objects must be linked to the objects you wish to pick up. Exciter objects are similar; e.g., a Mallet must be connected to a Body in order to strike it.
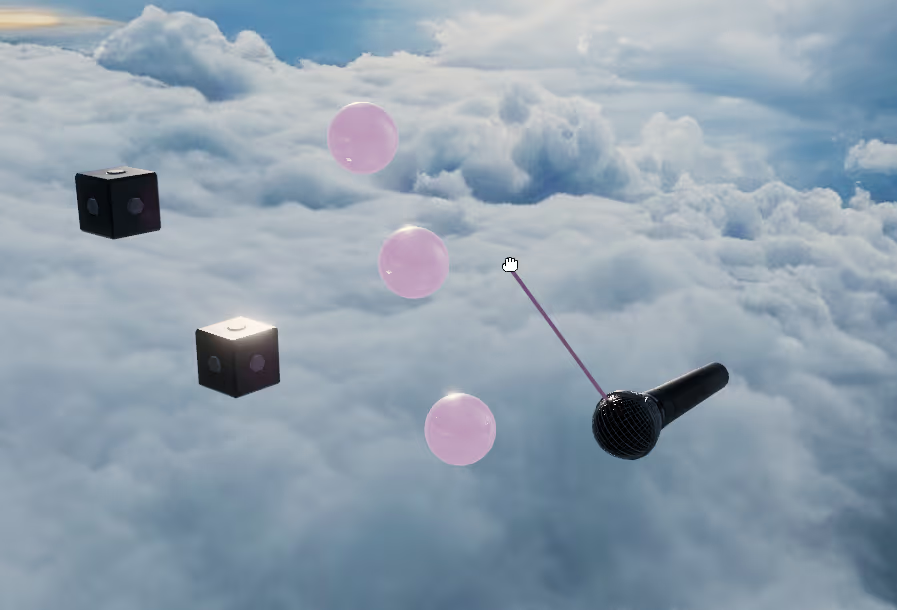
The easiest way to link two objects together is to hover the mouse over an object and press the "C" hotkey ("C" stands for "Connect"). This will highlight all the objects that the first object can be connected to. Then, click the mouse on one of the highlighted objects to connect them.
In the diagram below, the "C" hotkey was pressed with the mouse over the Mic object. The three Body objects are highlighted, but the two Anchor objects are not, which tells you that the Mic can be connected to a Body but not an Anchor. Clicking on a Body will connect it to the Mic.
Connecting Multiple Objects#
You can also connect an object to multiple other objects. For example, since Mic objects only pick up sound from connected Body objects, you may wish to connect a Mic to several Body objects to pick up sound from all of them.
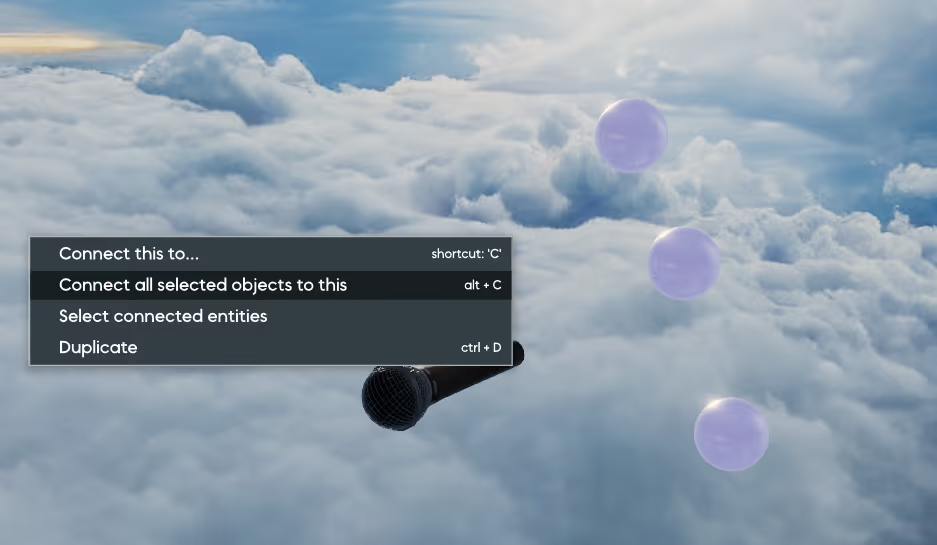
Option 1: Select all the objects that you wish to connect to another object, then right-click on that target object. Next, select the "Connect all selected objects to this" menu option, as shown in the diagram below.
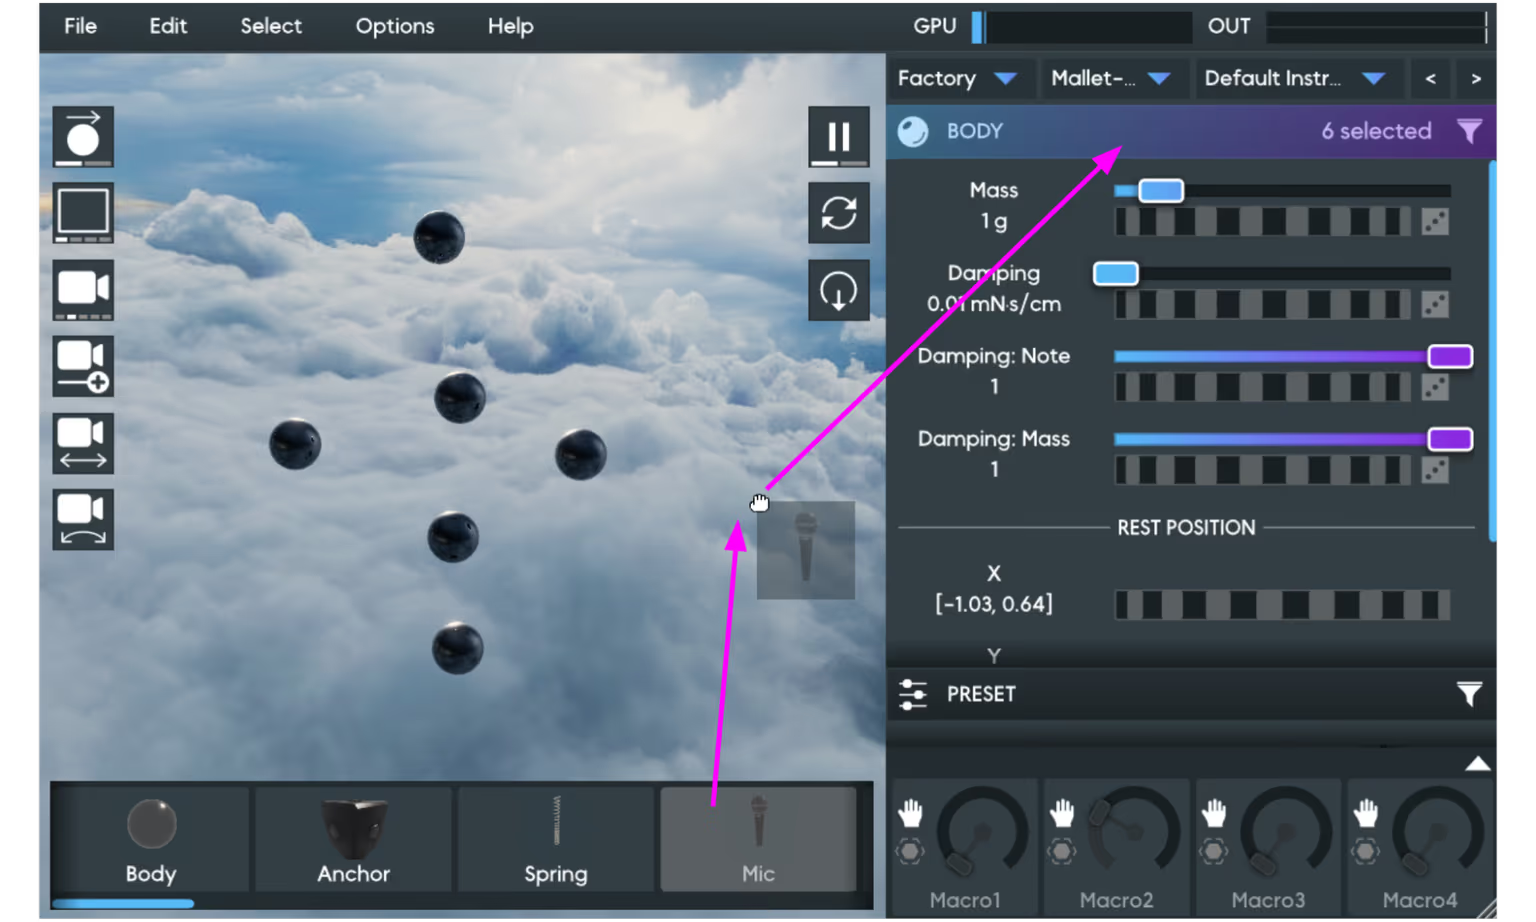
Option 2: Select multiple objects, then drag another object from the Object Palette (at the bottom of the screen) onto the Object Editor panel header for the previously selected objects.
For example, as shown in the diagram below, multiple Body objects are selected, and a Mic object is being dragged from the Object Palette. The header for the "BODY" Object Editor panel on the right side is highlighted, indicating that dropping the Mic on this header will create a Mic object that is connected to all the selected Body objects.
Copy, Paste, and Duplicate#
Anukari supports Copy, Paste, and Duplicate operations that you are likely already familiar with. These options are available under the Edit menu, when right-clicking a selected object, or via the following hotkeys:
-
Copy: Ctrl + C (Windows), ⌘ + C (Mac)
-
Paste: Ctrl + V (Windows), ⌘ + V (Mac)
-
Duplicate: Ctrl + D (Windows), ⌘ + D (Mac)
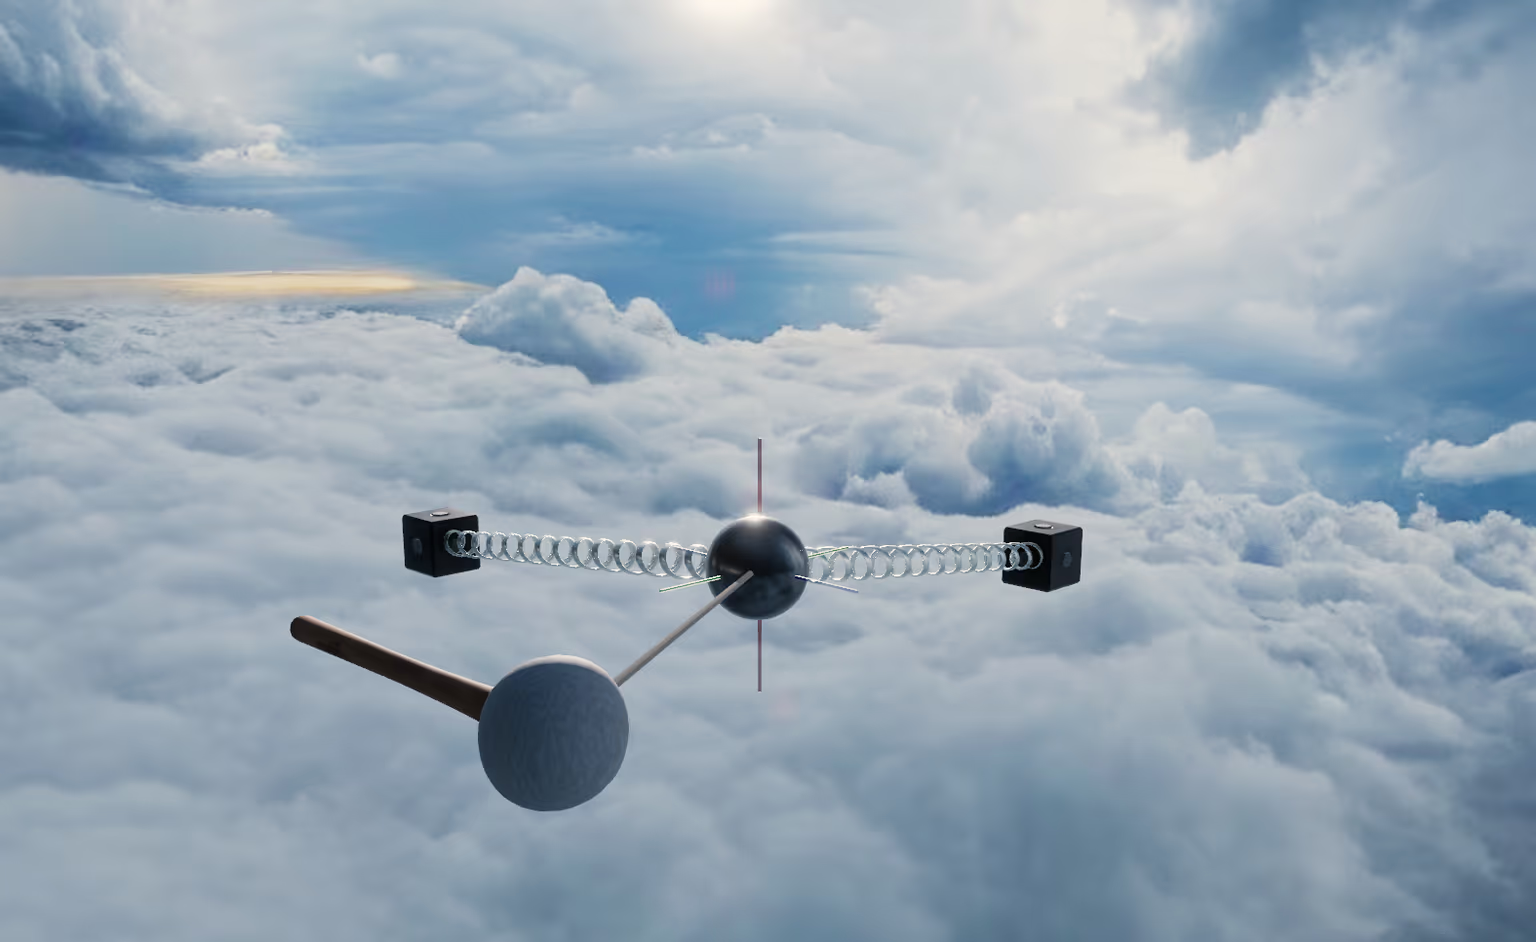
In the sample preset below, a Body is connected by Springs to two Anchors, and a Mallet is connected to the Body. If you select only the Body and two Anchors and then press the Duplicate hotkey, this will be the result:
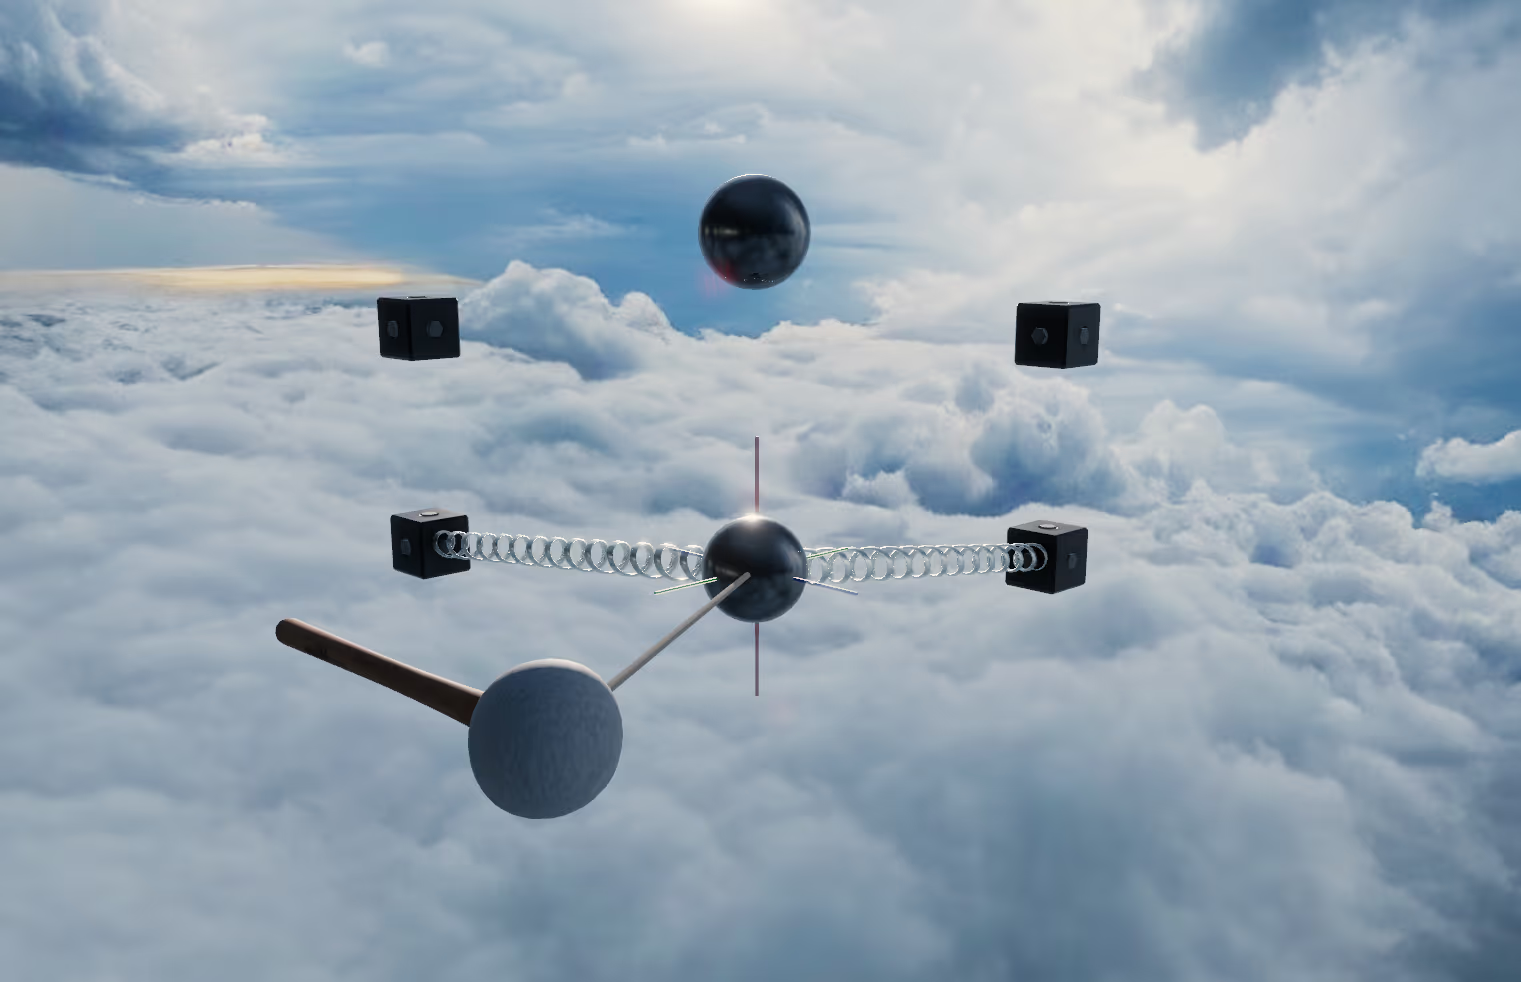
Notice that the Spring objects are not copied, because they were not part of the original selection.
Now let's look at what happens if you select the Body, the Anchors, and the Springs, and then press the Duplicate hotkey:
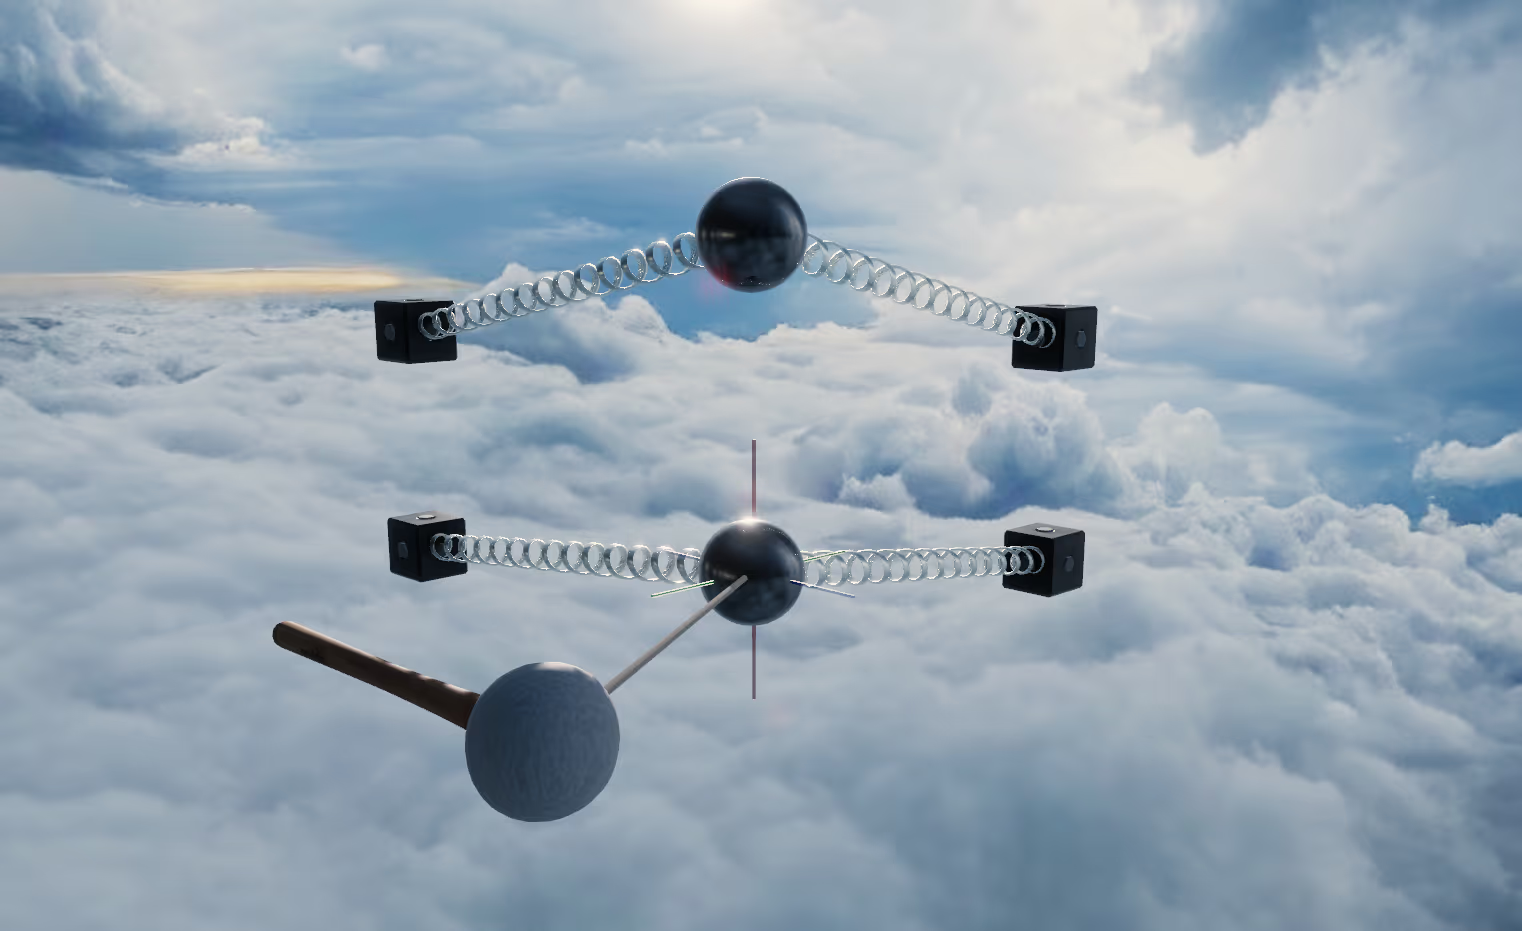
Notice that this time, because the Spring objects were selected, they are copied.
Now let's look at what happens if we select everything except the Mallet object. The Body, Anchors, Springs, and even the Exciter Link are selected, and then Duplicated:
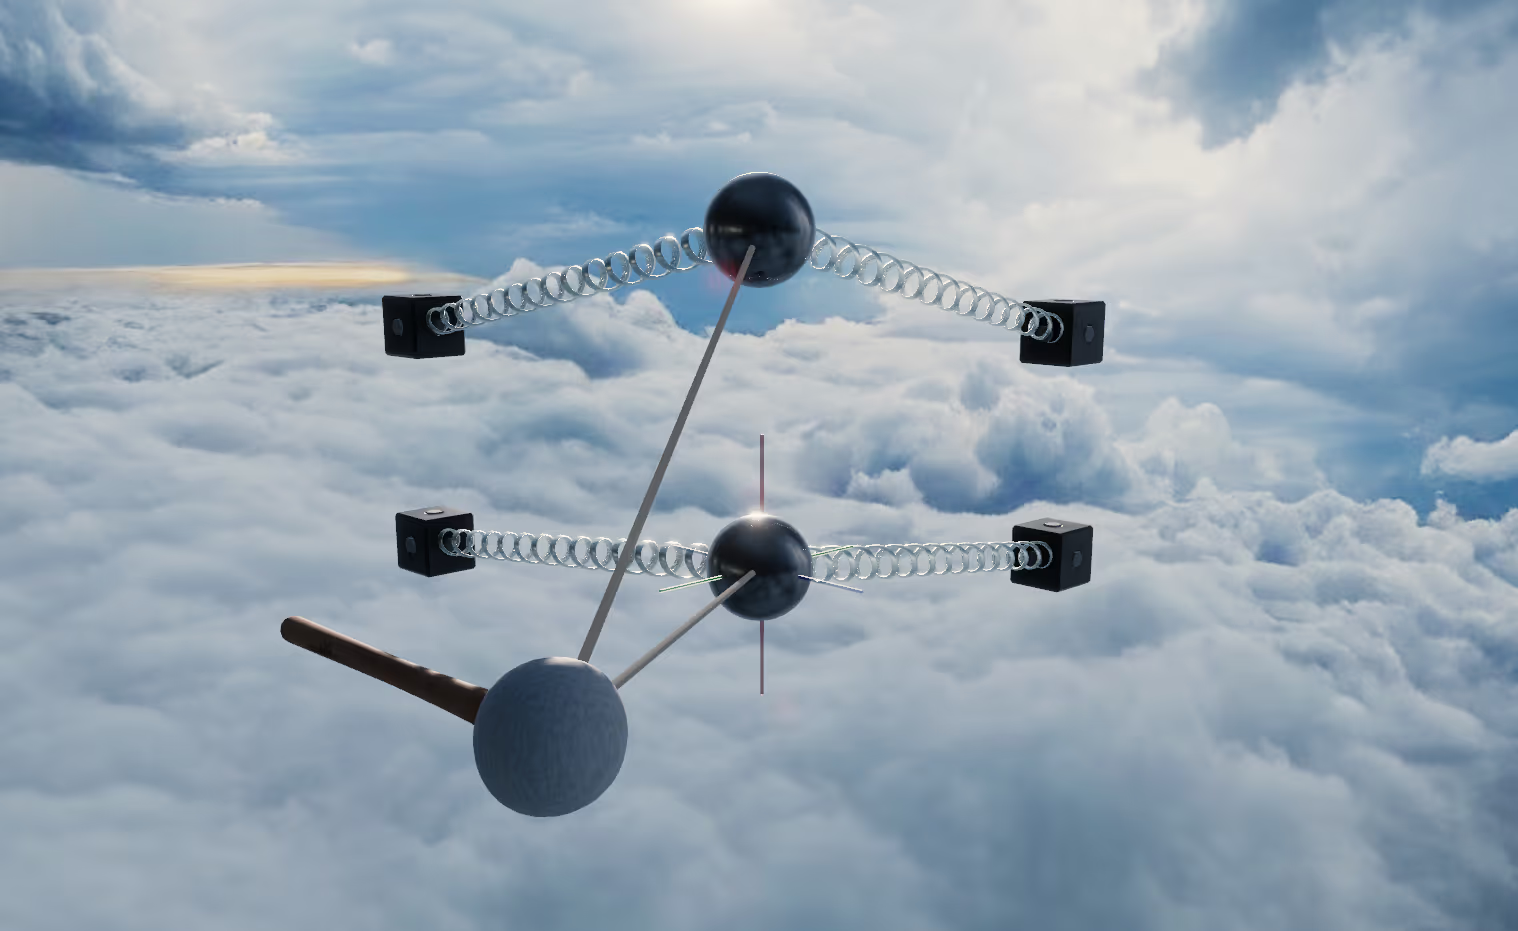
Notice how the duplicated system is connected to the original unduplicated Mallet object. This function is useful when you wish to duplicate some objects, but not others, while ensuring that the duplicate objects remain connected to the objects that were not duplicated.
Finally, to duplicate the entire system, you can select everything (including the Mallet) and Duplicate:
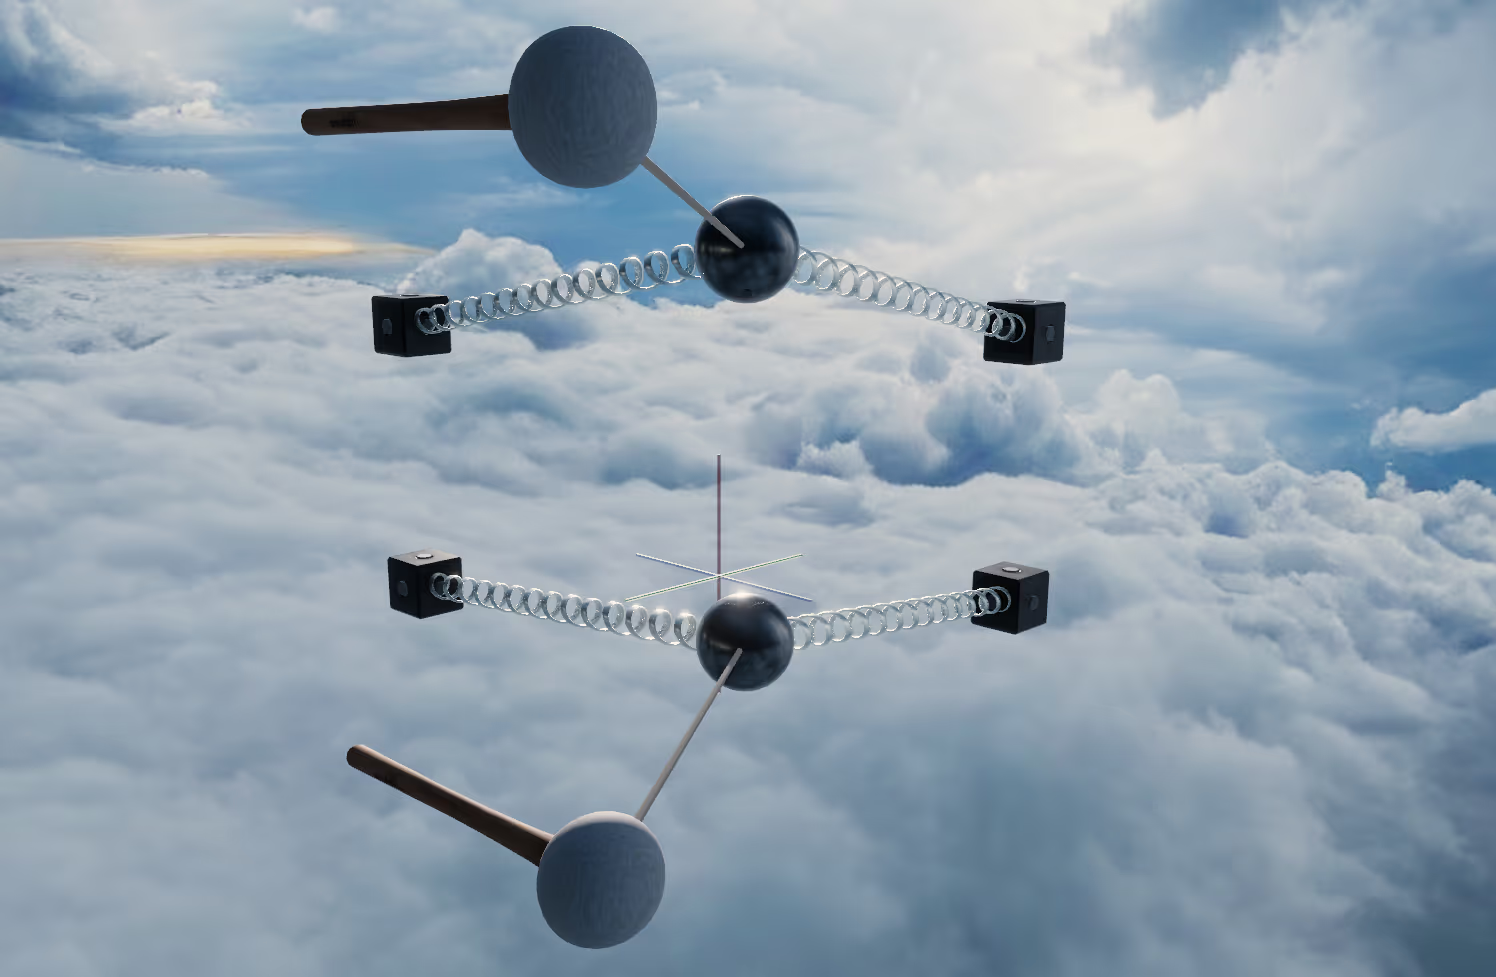
Notice how this results in a full duplicate copy of all objects.
By making careful choices about which objects are selected when using Copy, Paste, or Duplicate, you can determine how the resulting system or objects are connected to existing objects.
Parameter Sliders#
The main tool for editing numeric parameters in Anukari is the Parameter Slider. These sliders appear in the right-hand Object Parameter Editor panel, based on what kinds of objects are selected in the 3D view. When the slider is moved, it changes the parameter value for all of the objects selected in the 3D view.
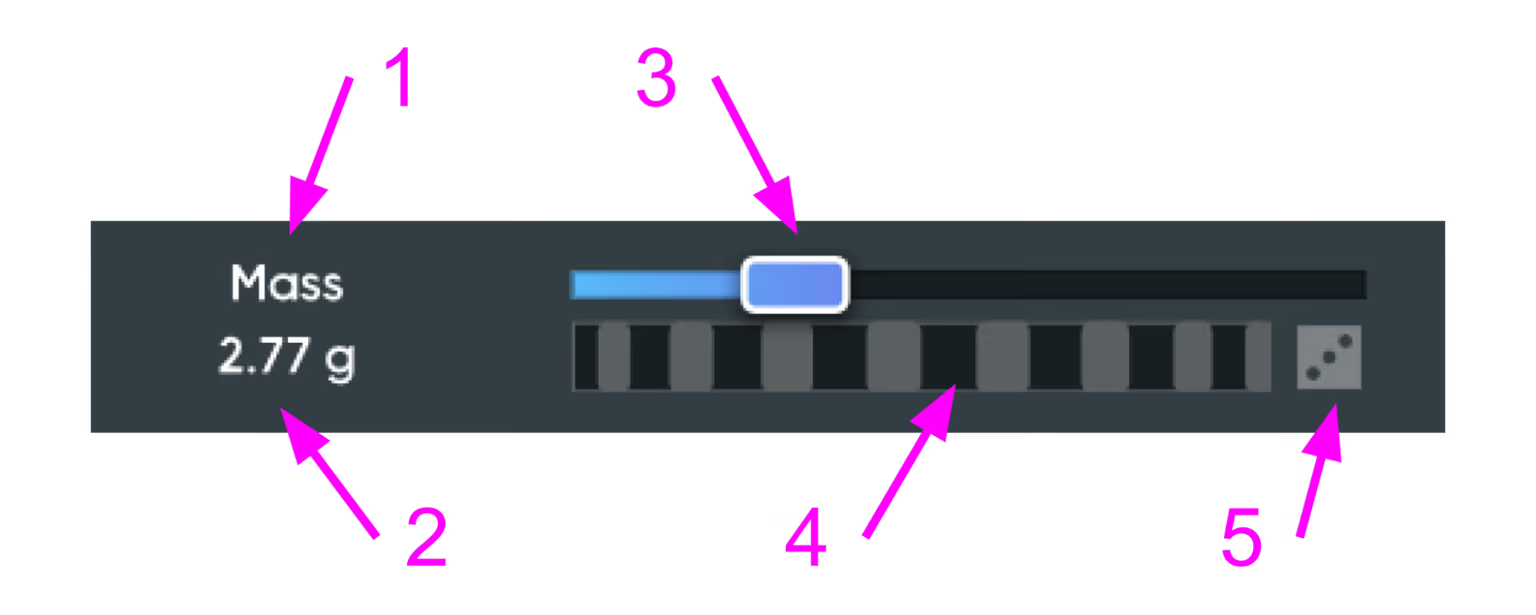
-
Parameter name: The name of the parameter that this slider controls; in this case, mass. Hovering the mouse over the name will show a detailed tooltip explaining what this parameter does.
-
Parameter value and units: The value of the parameter and units; in this case, 2.77 grams. Click on this to open a text editor where you can type in a precise value.
-
Coarse adjustment: Drag this slider or click along its track to make larger adjustments to the parameter value. You can also hover the mouse over this and use the scroll wheel. Right-click the slider handle to "split" a single-value slider into a Range-Value Slider. For sliders that have a default value, double-clicking this will reset the value to the default.
-
Fine adjustment: Drag this thumbwheel to make smaller adjustments to fine-tune the parameter value. This is especially useful when tuning the pitch of an instrument or making other changes where the sound is very sensitive to the precise value. You can also hover the mouse over this and use the scroll wheel.
-
Randomize button: Click this button to assign a random value for the parameter.
Range-Value Sliders#
Parameter Sliders control the value for all objects selected in the 3D view. But each object has its own unique parameters, which means that if multiple objects are selected, they may have varying parameter values.
In this situation, the Parameter Slider will appear as a Range-Value Slider, which allows the parameter values to be edited in bulk by stretching, compressing, or shifting the value range.
For example, if five Body objects are selected, and their masses are 1, 2, 3, 4, and 5, respectively, then the Range-Value Slider will show a range of 1 to 5. If the top of the range is stretched to 10, then their masses would become 1, 4, 6, 8, and 10, respectively. Notice how their values are stretched proportionally over the range.
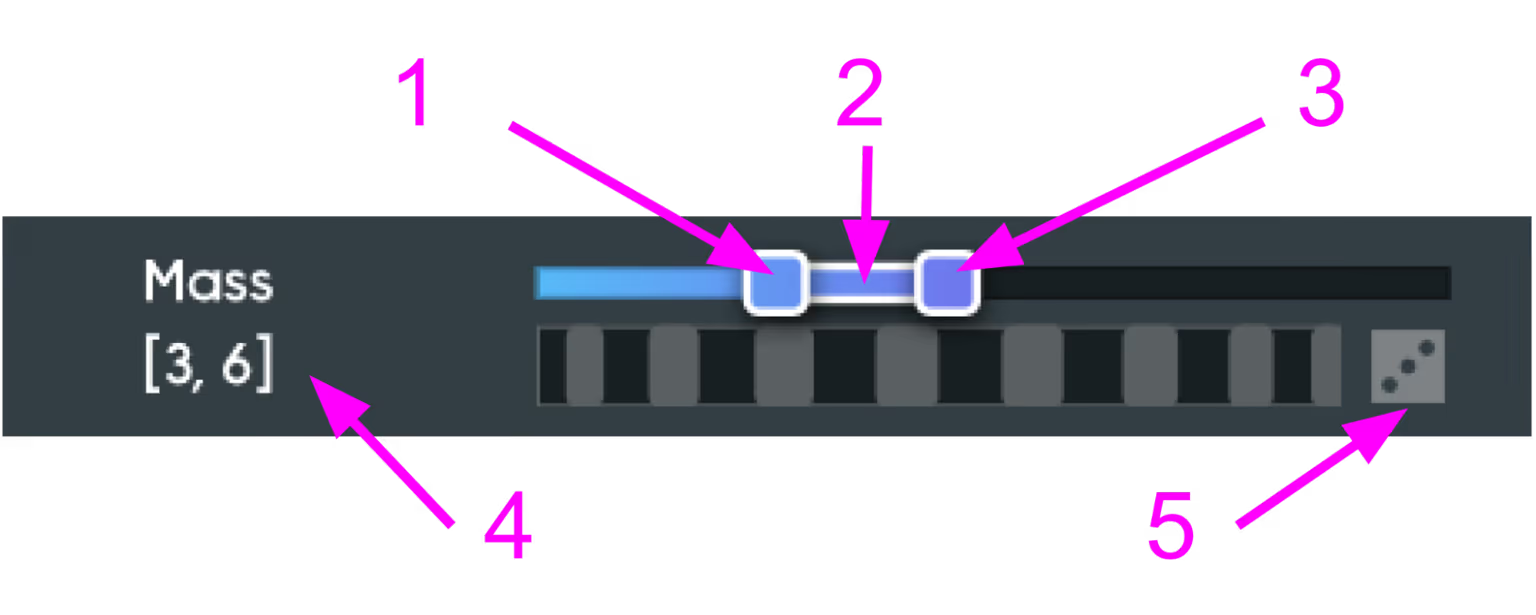
-
Low value handle: Indicates the lowest value of this parameter over all selected objects. Drag this to stretch or compress the range of parameter values for all selected objects.
-
All values handle: Drag this to shift the parameter values for all selected objects up and down without stretching or compressing the range.
-
High value handle: Indicates the highest value of this parameter over all selected objects. Drag this to stretch or compress the range of parameter values for all selected objects.
-
Parameter value range: The numeric range of parameter values. Click on this to open a text editor where you can type in a precise range in the following format: [lowest, highest]. The square brackets are important; if you type a single number without brackets, then the parameter on all objects will be set to the same value.
-
Randomize button: Click this to randomize the parameter values for all selected objects within the current range. Clicking multiple times will continue to use the original range for randomization.
Using Macros#
Anukari supports drag-and-drop Macros, which allow you to quickly set up on-screen knobs to control parameter values. There are a total of eight Macros available.
When running Anukari as a plugin in a DAW, these Macros will be visible in the DAW as parameters that can be automated, recorded, etc.
When running Anukari as a standalone app, these Macros are automatically mapped to MIDI Continuous Control numbers 1-8. On most MIDI controllers, these will correspond to the Mod wheel (#1) as well as the physical knobs and sliders on the controller. Note that some controllers may use different Control numbers than 1-8, and the controller may need to be configured to use 1-8 for compatibility with Anukari.
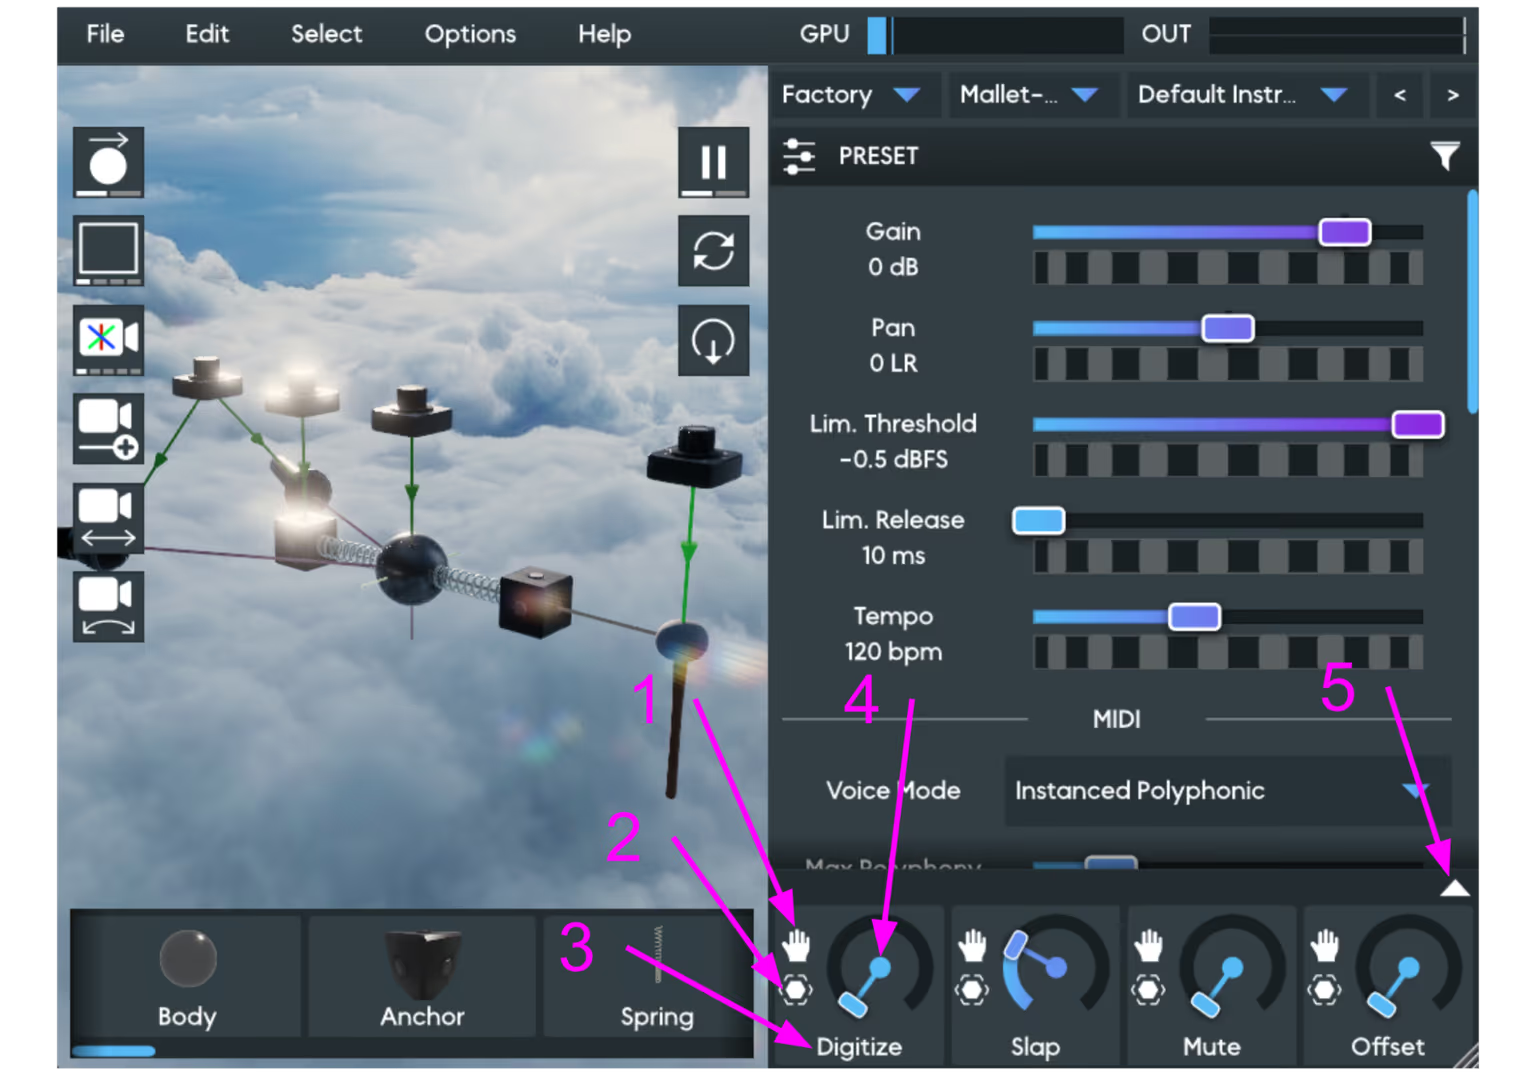
-
Drag and Drop Handle: Click and drag from this handle onto the 3D view to create an unconnected Macro object. Or, drag it onto a modulatable parameter in the Object Editor panel on the right side to connect it to that parameter on the selected objects (see the Macro Drag and Drop section for a detailed explanation).
-
Select Button: Click here to select all of the Macro objects in the 3D view that are controlled by this knob. Many Macro objects can be controlled by one knob.
-
Macro Name: Click here to edit the Macro name. When running Anukari as a plugin, this name will appear in your DAW so that you know which parameter is which. This name is saved as part of the current preset.
-
Macro Knob: Click and drag here to change the Macro value. When running Anukari as a plugin, adjustments made to this knob will be visible in your DAW and can be recorded. Right-clicking the knob will open up the DAW automation menu (for DAWs that support this).
-
Expand/Contract Panel Button: Click here to expand the Macro panel to show all eight Macros; click again to go back to showing just four Macros.
Macro Drag and Drop#
Like all other objects in Anukari, Macro objects must be connected to other objects in order to work. Connecting Macro objects can be done in the 3D view by creating a connection with the "C" hotkey (or other means), and then by selecting the Modulator Link and editing its Target parameter. However, there is a much faster way to create Macros, which is the drag-and-drop system.
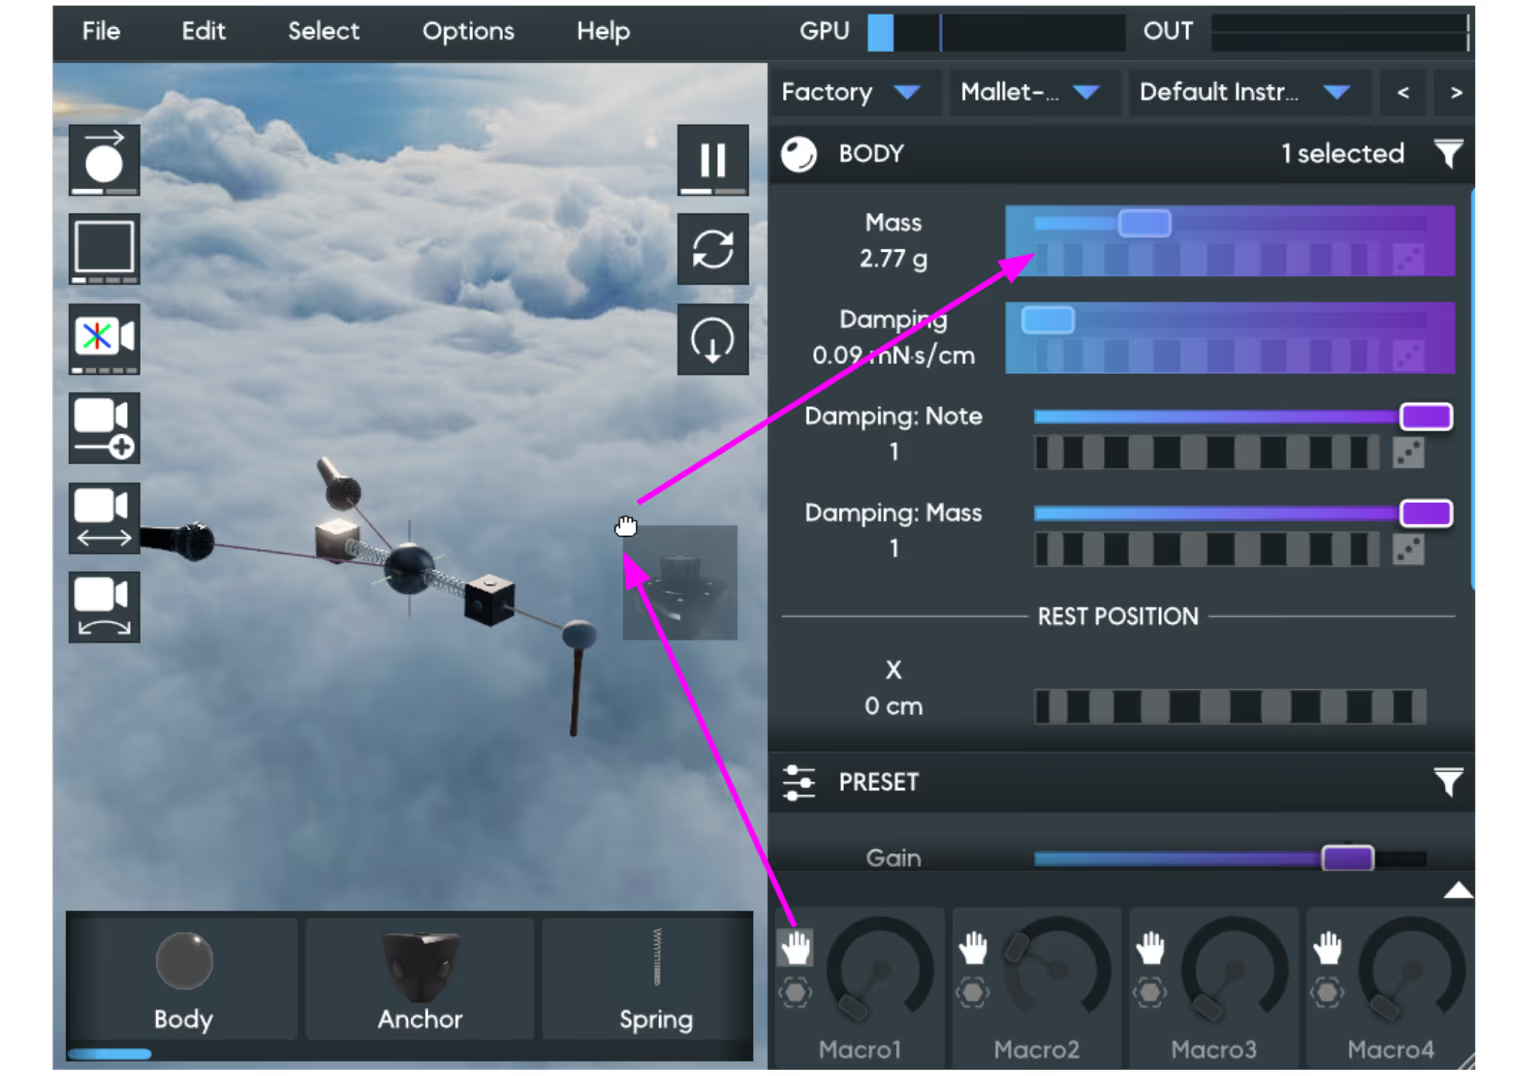
To use the drag-and-drop system, first select the objects that you wish to modulate in the 3D view. For example, if you wish to modulate the Mass on several Body objects, you would start by selecting the desired Body objects.
The next step is to drag the mouse from the desired Macro's handle (i.e., the little hand icon next to the knob). While dragging the mouse, the parameters that can be modulated on the selected objects will be highlighted in the Object Editor panel on the right-hand side. Dragging the mouse to one of the highlighted parameters and then dropping the Macro on it will automatically create a Macro object in the 3D view connected to the given parameter on the selected objects.
Other Drag and Drop#
Some non-Modulator objects can also be connected to other objects via the same drag-and-drop system. This feature can be used to conveniently connect a new object to many target objects. To use this feature, select the desired target objects in the 3D view, and then drag a new object from the Object Palette onto the heading in the right-hand Object Editor panel for the target objects, as shown in this diagram:
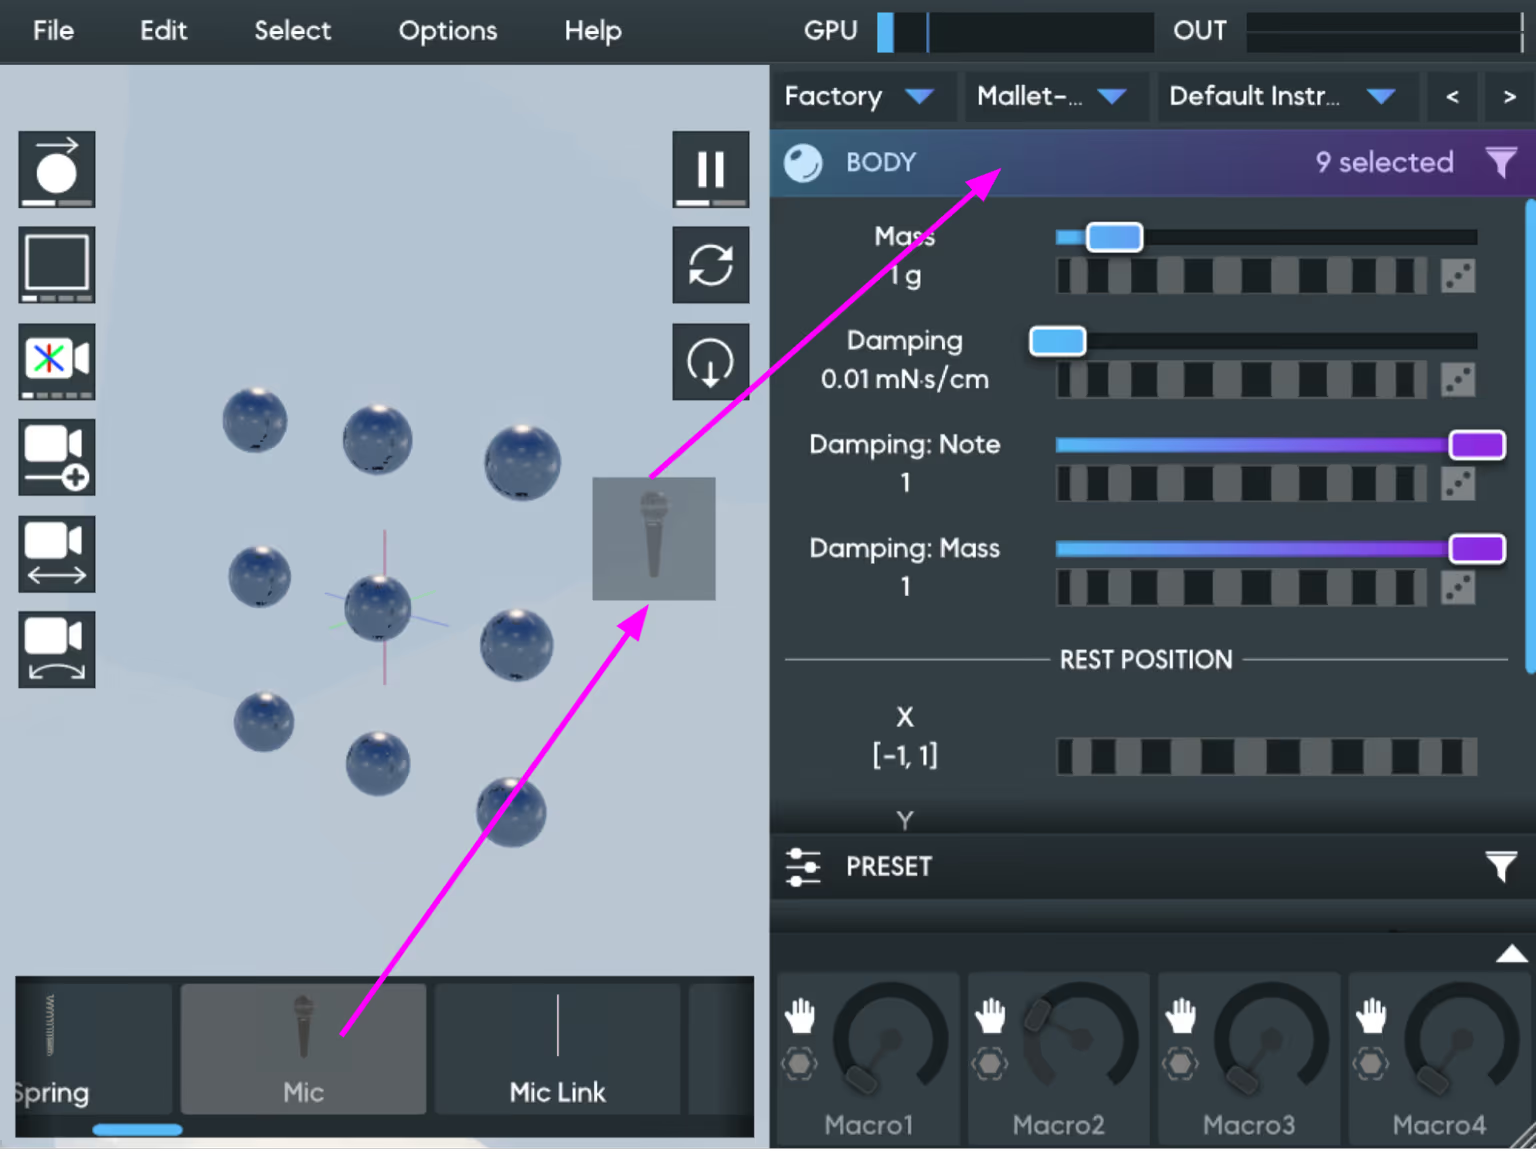
The following kinds of connections can be made using this drag-and-drop feature:
- Drag new Mic onto Body heading: This will connect the Mic to the selected Bodies with Mic Links.
- Drag new Mic onto Envelope Follower heading: This will connect the Mic to the selected Envelope Followers with Delay Lines.
- Drag new Exciter (Mallet, Audio Input, Oscillator, Bow, Plectrum) onto Body heading: This will connect the Exciter to the selected Bodies with Exciter Links.
- Drag new Audio Input onto Mic heading: This will connect the Audio Input Exciter to the selected Mics with Delay Line links.
Hotkey Mode#
The hotkey mode setting controls how Anukari handles keyboard input, which is particularly important when running as a plugin inside a DAW.
Accessing: Options > Global hotkey mode, then choose one of three modes.
- Normal (default): All of Anukari's keyboard shortcuts are active (undo, save, copy, paste, etc.). Key presses are not passed through to the DAW, which prevents accidental DAW commands while Anukari is focused.
- QWERTY Piano Only: Disables all keyboard shortcuts except the QWERTY piano (the on-screen keyboard you can play with your computer keyboard). Unhandled keys are passed through to the DAW. Use this mode when you want to play notes with your keyboard without accidentally triggering Anukari menu shortcuts, while still being able to use your DAW's own keyboard shortcuts.
- Disabled: All keyboard shortcuts are disabled and all key presses are passed through to the DAW. Use this if you want full keyboard control of your DAW while Anukari is open.
On-Screen MIDI Keyboard#
The on-screen keyboard lets you play notes without a physical MIDI controller.

Showing and hiding: Options > Show on-screen keyboard, or press Ctrl+K (Cmd+K on macOS). The keyboard appears as a panel below the 3D viewport.
Playing with your mouse: Click the piano keys directly. The vertical placement of the click on the key controls the MIDI velocity. Clicking near the bottom of a key will play the note with a higher velocity than clicking near the top. For presets using MPE, this vertical dimension controls the MIDI CC74 axis instead of velocity.
Playing with your computer keyboard: The home row of the keyboard is mapped chromatically starting from C. You can hold multiple keys at once to play chords.
Octave transpose: Use the arrow buttons on the left side of the keyboard to shift the note range up or down.
Pitch wheel: A pitch wheel control is available on the left side of the keyboard.
When using MPE mode, the on-screen keyboard displays gradient indicators showing per-note pitch bend, slide, and pressure.