
Global Preferences
The Global Preferences window contains various application settings that determine how Anukari works on your computer. It can be accessed by clicking on "Options" in the menu bar and then selecting "Preferences." The settings are categorized into five tabs.
Audio Device#
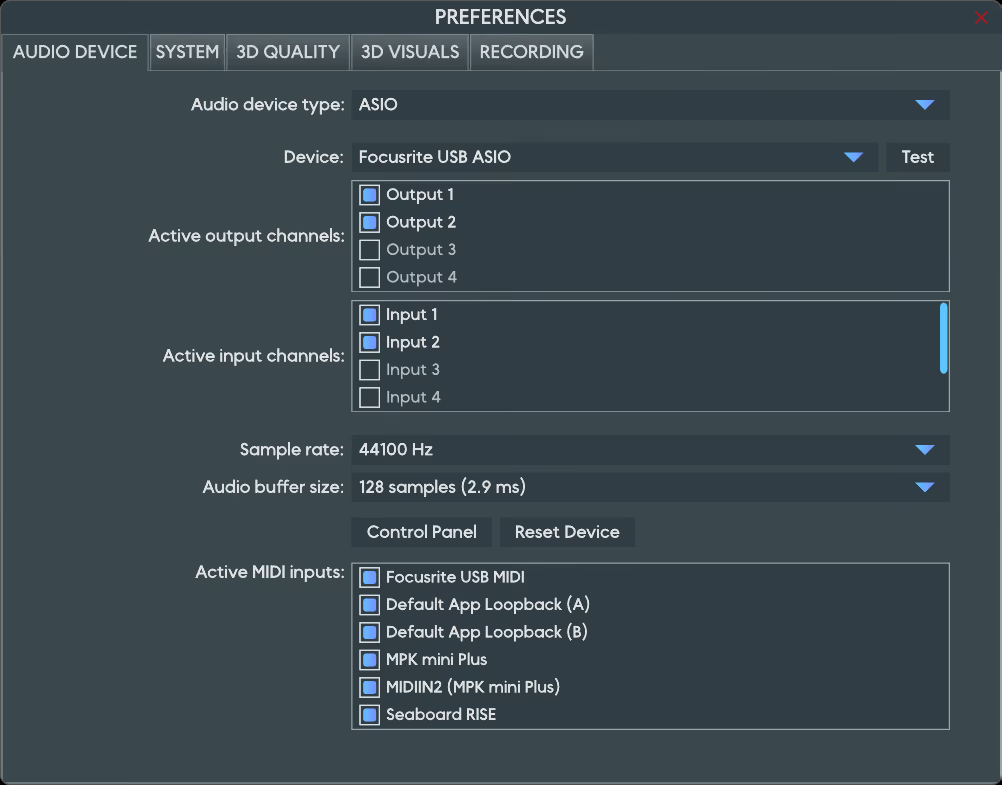
The "Audio Device" tab has the following options. [Note: This tab only appears for the standalone version of Anukari. The plugin version of Anukari uses the audio device settings from its host DAW.]
- Output: This is the device that Anukari will use to output its sound.
- Input: This is the device that Anukari will use for bringing input signals (like a microphone or guitar signal) into the app.
- Active Output Channels: Some devices have multiple channels for outputting sound. Here, a user can select which one(s) they wish to use with Anukari.
- Active Input Channels: Some devices have multiple channels for inputting sound. Here, a user can select which one(s) they wish to use with Anukari.
- Sample Rate: This selects the digital sample rate that Anukari will use to generate sound.
- Audio Buffer Size: To reduce input/output latency, the buffer size should be reduced to as low as possible. However, lower buffer settings will increase your computer's workload. It is best to find a balance between the buffer and processing, which will vary from computer to computer. For more info, see the section on Plugin Performance.
- Active MIDI Inputs: These are the MIDI devices that can be used with Anukari. Checking the device will enable it for use within Anukari.
- Bluetooth MIDI: This will allow Anukari to scan for any MIDI devices that are Bluetooth-enabled (macOS only).
System#
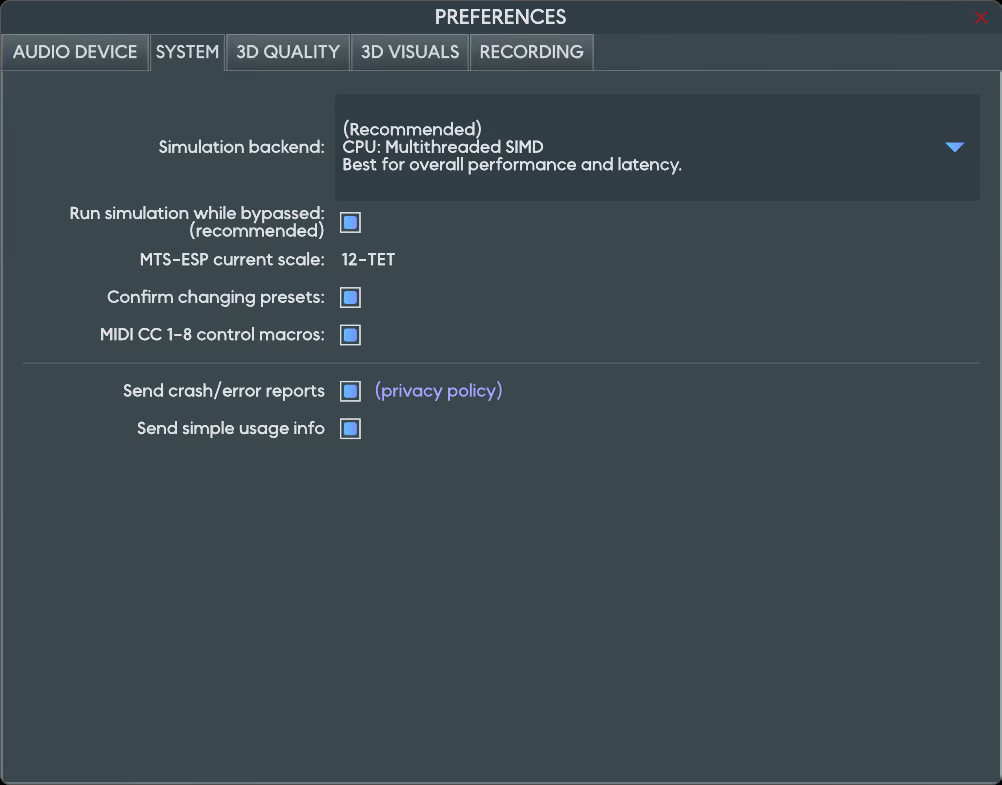
The "System" tab offers options related to the physics simulation engine and general application behavior.
- Simulation Backend: Selects the backend to use for processing the physics simulation. The recommended backend should be automatically selected. This setting should only need to be changed for advanced use cases, such as with DAWs that do not have good multithreading support.
- Run simulation while bypassed (recommended): Some DAWs will bypass plugins automatically to save CPU, such as when the track for an effect plugin is not being played, or when an instrument has not recently received a MIDI event. When this option is enabled, Anukari will continue the physics simulation even when bypassed. It is strongly recommended that this option be left ON. When this option is off, Anukari's physics will not function correctly while bypassed, and there may be clicks/pops when the DAW removes the automatic bypass.
- MTS-ESP current scale: Shows the microtuning scale that Anukari is currently using, if an MTS-ESP control plugin such as MTS-ESP Mini is running. See MTS-ESP Microtuning Support.
- Confirm changing presets: When enabled, Anukari will ask you to confirm before loading a new preset if the current preset has unsaved changes. Turn this off if you prefer to live dangerously and switch presets freely without confirmation prompts.
- MIDI CC 1-8 control macros: When enabled, MIDI CC 1-8 directly control Macros 1-8.
- Send crash/error reports: Whether to send automated crash reports, which are a huge help for making Anukari more stable. Turn this off if you are not comfortable sending information about crashes.
- Send simple usage info: Whether to send simple usage information, such as how often certain features get used. This never includes anything you create (presets, audio, etc.).
3D Quality#
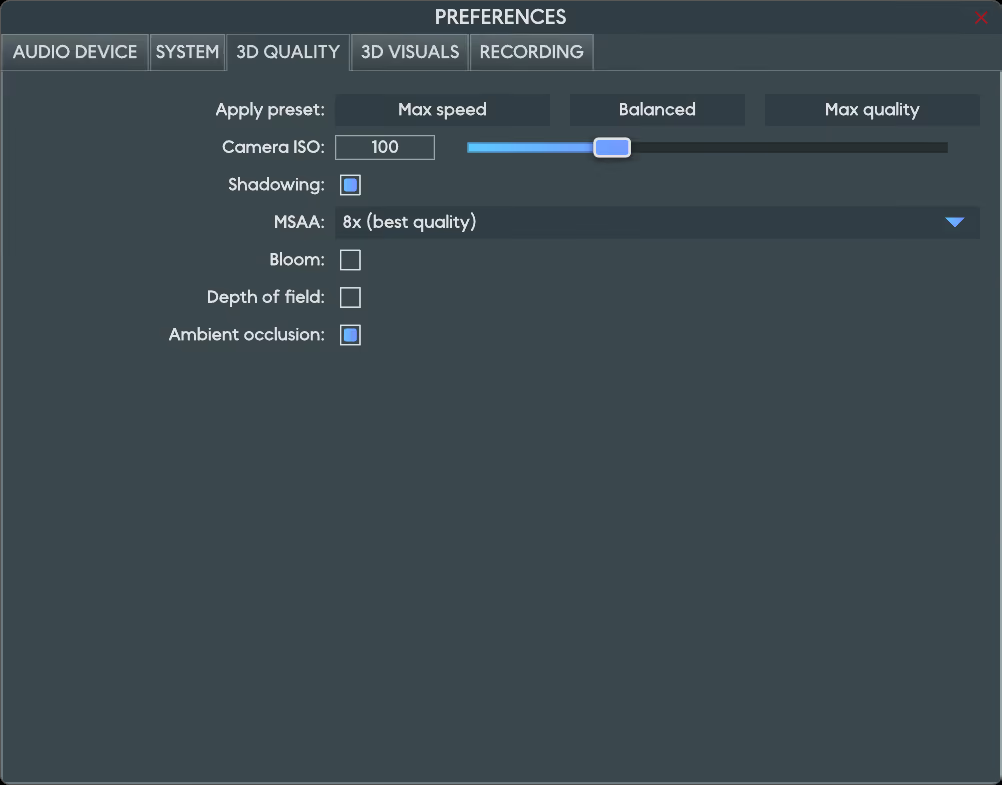
Settings in the "3D Quality" tab will determine the quality of the virtual 3D space and objects within it.
- Apply Preset: Click one of these preset buttons (Max speed, Balanced, or Max quality) to automatically choose settings for speed vs. quality. This will overwrite any settings you've chosen manually below.
- Camera ISO: The light-sensitivity level for the camera. Higher numbers will make the scene brighter. An ISO of 100 is a good default.
- Shadowing: Shadows add realism at moderate rendering cost.
- MSAA: Multisample anti-aliasing reduces jagged pixel edges. Higher levels look better but cost more to render. If the selected level is not supported by your GPU, the highest supported level is used instead.
- Bloom: Bloom adds blurry spots and lens flare when a bright spot is visible, at moderate rendering cost.
- Bloom Strength: Adjusts how strong the bloom effect is.
- Lens Flare Intensity: Adjusts how strong the lens flare effect is. Set to zero to disable.
- Depth of Field: Depth of field makes objects that the camera is not focused on blurry, at high rendering cost.
- Depth of Field Focus Selection: Focus the camera's depth of field effect on the currently selected objects. Disable this to choose a static focus distance.
- Depth of Field Distance: The distance from the camera at which the focus is set. Objects at this distance will be sharp, and objects nearer/further will be progressively more blurry.
- Depth of Field Strength: Adjusts the strength of the depth of field blur effect.
- Ambient Occlusion: Ambient occlusion shades objects more realistically at a small rendering cost.
3D Visuals#
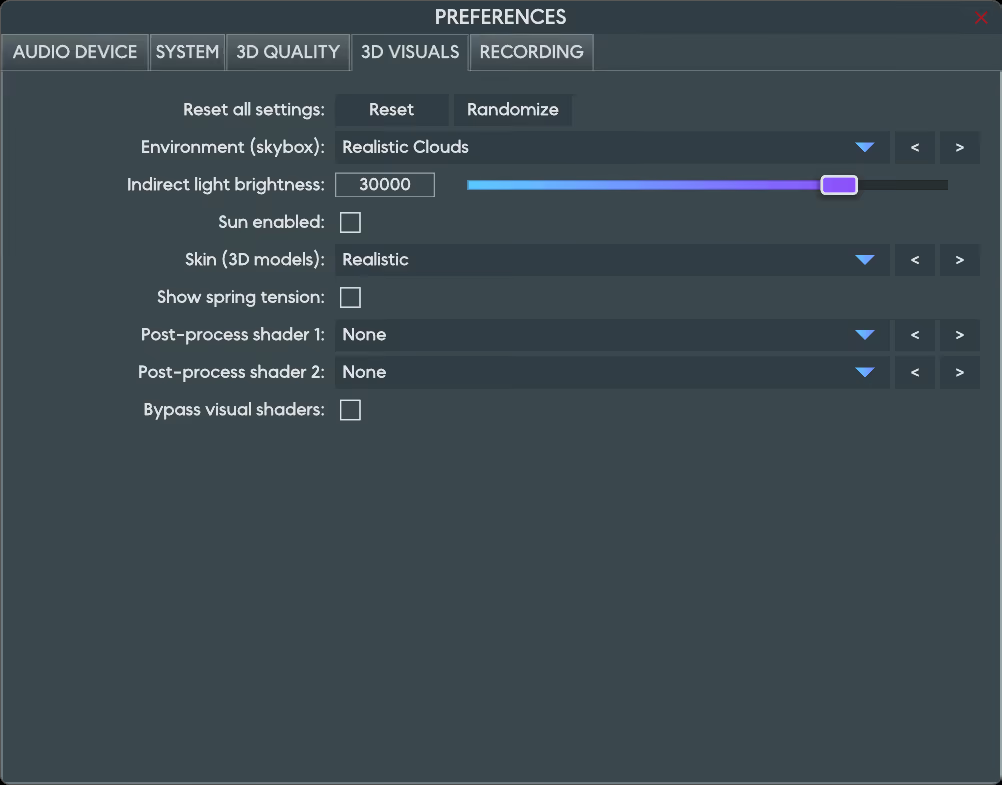
With the "3D Visuals" settings, you can customize the look of Anukari's graphical interface.
- Reset To Defaults: Resets the settings below to their factory default values.
- Randomize: Randomizes every setting in this menu. Get ready for chaos!
- Environment (Skybox): Changes the appearance of the environment, including the skybox and ambient lighting. In addition to the factory environments, you can choose a custom color gradient, image file, or folder of images.
- Indirect Light Brightness: Adjusts the intensity of the environment's indirect lighting (in lux). A value of 30,000 would be typical for a daytime outdoor scene.
- Sun Enabled: Toggles whether sunlight is enabled. If this setting is off, then the instrument will only be lit via indirect environmental lighting.
- Show Sun Disc: Toggles whether a representation of the sun's disc should be visually rendered in the sky. Light from the sun is emitted regardless of this setting.
- Sun Position: Changes the position of the sun's visible disc (and its light direction) to the center of the current 3D camera view.
- Sun Brightness: Adjusts the intensity of the sun (in lux). A value of 110,000 would be typical for a daytime outdoor scene.
- Sun Color: Choose the color of the light emitted by the sun and its visible disc.
- Skin (3D models): Changes the appearance of the physics objects, such as the 3D models for the Bodies, Springs, Mallets, etc. Custom skins can also be loaded from a file or folder.
- Show Spring Tension: Toggles whether Springs should be colored red when under tension (stretched) and green when under compression (squished).
- Post-process Shader 1: Applies a post-processing shader effect to the 3D view. Shaders can react to audio levels and include custom textures. See the Visual Shaders section for more information.
- Post-process Shader 2: Applies a second post-processing shader effect after the first. The output of Shader 1 is fed as input to Shader 2.
- Bypass visual shaders: Bypass the post-processing shaders to show the plain 3D view.
Recording#
The "Recording" tab configures video recording of the 3D viewport. Its settings are covered in the Video Recording section.