devlog > ux
Finally Anukari has macros, and a preset API
Captain's Log: Stardate 79052
The problem
Anukari has long had a modulation system, with LFOs, host automation controllers, MIDI, etc. But adding modulation to a preset has always been a kind of labor-intensive process. And one big gaping hole in the UX was the lack of a way to bind a knob inside Anukari itself to allow modulation to be controlled via the mouse.
The lack of mouse control was a hassle, but the problems were a bit deeper than that. Because of this issue, interfacing with the DAW was always not quite the way users expected. For example, in FL Studio you can choose an automation via the learn feature by "wiggling" a knob inside a VST plugin. FL Studio watches and sees which knob was wiggled and binds it. But of course with no mouse-controlled knobs inside Anukari, this was not possible.
Furthermore, while it was possible to map host parameters to automations inside Anukari, they could only be controlled via the DAW, which is really inconvenient, and often is a really weird workflow. Users expect to be able to hit "record" in the DAW and then go play the VST, knobs and all, and have everything recorded.
Macros
The solution was to add some knobs inside Anukari that can be mapped to control the modulation system. Those are shown here in the lower right-hand corner:
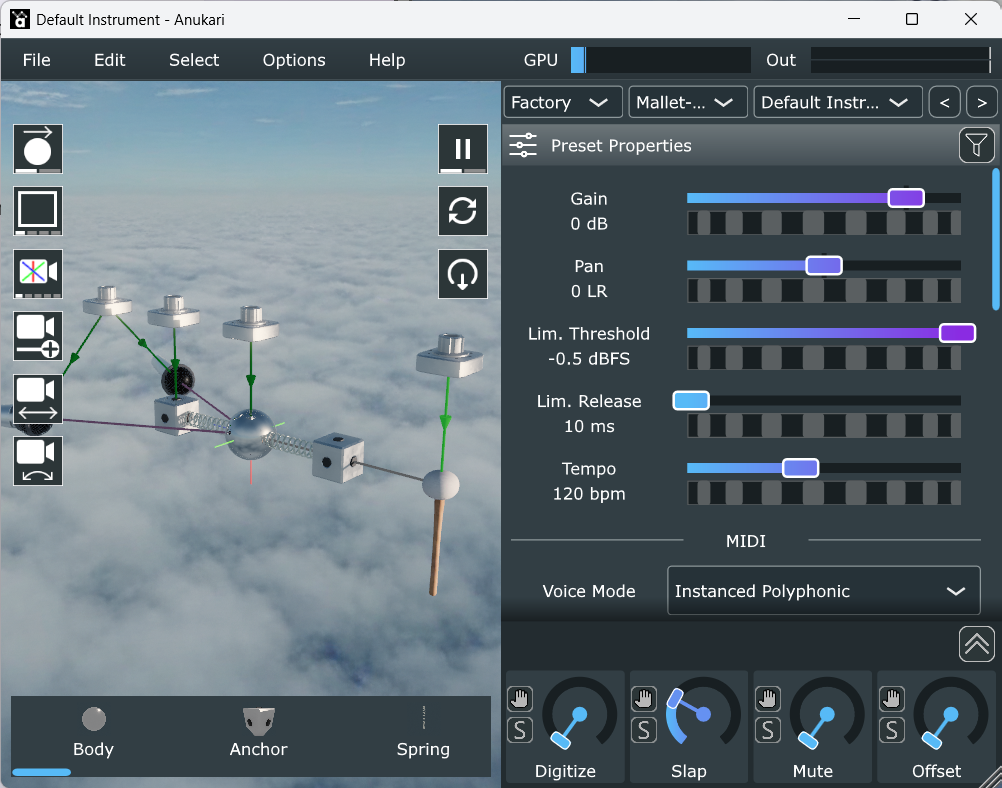
(The icons and graphics are still provisional while I wait for my designer to improve them.)
There are eight knobs in total (in the screenshot only four are showing, and the other 4 are collapsed). Each knob can be renamed, and corresponds to a mapping that will automatically appear in the DAW. And each knob is connected to any number of 3D Macro objects, which it will control.
This is already really handy, but the killer feature is the little grabby-hand button icon next to each macro knob. When the user drags this, parameters in the right-hand editor panel that can be modulated will automatically be highlighted, and when the user drops onto one of them, a 3D Macro object will be created which is automatically linked to the given parameter on all selected entities. Here's an example:
This is a pretty transformative change. It is dramatically easier to create automations inside Anukari, play with them, and edit them. And then they can be performed with the knob movements recorded in the DAW.
Side benefits
The new macro system addressed a bunch of feedback I repeatedly got from users, and solved a bunch of problems. But in addition to that, there were a number of extra advantages to the new system that came very cheaply.
Having the drag-and-drop system for modulation naturally made it easy to do the same thing for other modulator types. So now, if a user drags in an LFO from the entity palette on the bottom of the screen, they can drag it straight to a highlighted parameter to create an LFO connected to that parameter on the selected entities. This can be done with any modulator and is hugely convenient.
Another big benefit is that now all the built-in automations for all the factory presets are discoverable. Previously with no knobs in the main UI, there was no easy way to see what parameters had been configured for modulation as you cycled through presets. Now you can see them all, and trivially play with them via the mouse. Even better, in the standalone app the 8 macro knobs map to MIDI continuous control parameters 1-8, so on most MIDI controllers you can just turn knobs and things will happen, with visual feedback.
Finally this opens the door for even more interesting drag-and-drop use cases. The first one I have in mind is for creating exciter objects, like Mallets. The idea is that the user will be able to select a bunch of Bodies (masses), and then drag the Mallet object from the palette onto the right-panel (which will be highlighted) and it will automatically create the Mallet and connect it to all the selected Bodies. This will be much more convenient than the workflow today.
Anukari Builder (preset API)
In the Anukari Discord server, the user 312ears is notable for providing extremely helpful feedback about Anukari, obviously borne out of using it in depth. When I first released the Beta, they were one of the people who suggested that it would be cool if it were possible to create presets programmatically, for example via a Python API.
I really wanted to help with this, but for the foreseeable future my time has to be focused on making the plugin itself work better. So I offered to release the Google Protocol Buffer definitions for the preset file format and provide a bit of support on using them, but could not commit to any kind of nice APIs.
Anyway, 312ears took the Protocol Buffer definitions and built an entire Python API for building Anukari presets. Their API can be found here: github.com/312ears/anukaribuilder.
This is an absolutely incredible contribution to the project and community. It allows users who can write Python to create presets that would otherwise be far too tedious to make. On some hardware Anukari supports up to 1,000 physics objects, and arranging them in a complex geometric pattern is difficult with the UI. But with Python all kinds of things become possible. For example, 312ears has shown demos in the Discord server of presets that can shift between two shapes, say a sphere and a pyramid, by turning a MIDI knob. Here's a quick example:
Multichannel, ASIO, Radeon, and randomization
Captain's Log: Stardate 79000.1
Whoa, it's been way too long since I updated the devlog. Here goes!
2025 MIDI Innovation Awards
Really quickly: Anukari is an entry in the 2025 MIDI Innovation Awards, and I would really appreciate your vote. You can vote on this page by entering your email and then navigating to the Software Prototypes/Non-Commercial Products category and scrolling way down to find Anukari. You have to pick 3 products to vote in that category. (I wish I could link to the vote page directly, but alas, it's not built that way.)
The prize for winning would be a shared booth for Anukari at the NAMM trade show, which would be a big deal for getting the word out.
Multichannel I/O Support
A while back, Joe Williams from CoSTAR LiveLab reached out to me asking if Anukari had multichannel output support. Evidently the UK government is investing in the arts, which as an American is a pretty (literally) foreign concept. One of the labs working on promoting live performance is LiveLab, and they have a big 28-channel Ambisonic dome. Joe saw Anukari and thought it would be cool to create an instrument with 28 mics outputting to those 28 speaker channels.
I'd received several requests for multichannel I/O, but hadn't yet prioritized the work. The LiveLab use case is really cool, though, and Anukari will be featured in a public exhibit later this month, so I decided to prioritize the multichannel work.
Anukari now supports 50x50 input/output channels. In the standalone app, this is really simple, you just enable however many channels your interface supports and then inside Anukari you assign each audio input exciter or mic to the channels you want.
It also works for the plugin, but how you utilize multichannel I/O is very DAW-dependent. Testing the new feature was kind of a pain in the butt, because I have about 15 DAWs for testing, and multichannel is a bit of an advanced feature, so I ended up watching a zillion tutorial videos. Every DAW approaches it a bit differently, and the UX is generally somewhat buried since it's a nice feature. But it works everywhere, and it is extremely cool to be able to map a bunch of mics to their own DAW tracks and give them independent effects chains and so on.
Behind the scenes, it was really important to me that the multichannel support did not impact performance, especially when it was not in use. I'm very happy to say I achieved this goal. When you're not using multichannel I/O, there is zero performance impact. And even in 50x50 mode the impact is very low. Anukari is well-suited for multichannel I/O since each mic is tapping into the same physics simulation at different points/angles, so none of the physics computations have to be repeated/duplicated. Really the only overhead is copying additional buffers into and out of the GPU. On the Windows CUDA backend, that's a single DMA memcpy, which is very fast. And on the macOS Metal backend, it's unified memory, so no overhead at all. All that remains is the CPU-CPU copy into the DAW audio buffers, which is very, very fast.
I look forward to posting about the LiveLab exhibit once it happens.
ASIO Support
It's a pretty big oversight that the Windows version of the Anukari Beta launched without ASIO support. I'm not quite sure how I missed this important feature, but I've added it now.
I think I always assumed it was there, but when using JUCE the ASIO support is not enabled by default because you need to get a countersigned agreement from Steinberg to use their headers to integrate with ASIO. I already had a signed agreement with them for the VST3 support, but ASIO is a completely separate legal agreement and so I went through the steps to get that as well.
ASIO support makes the standalone app perform much better (in terms of latency) for people with ASIO compatible sound interfaces.
AMD Radeon Crashes
Officially speaking, Anukari explicitly does not support AMD Radeon hardware. This is a bit of a long story, which at some point I will write about in more detail. But the short version is that the Radeon drivers are incredibly inconsistent across the Radeon hardware lineup, which makes it extremely difficult to offer full support. For some Radeon users, Anukari works perfectly, and for others it is unstable, glitchy, or crashes, in many different unique ways.
The story I'll write about for this devlog entry, though, is the extremely frustrating case that I solved for users that have both an AMD Radeon and an NVIDIA graphics card in the same machine. This is actually a common situation, because many (most? all?) AMD Ryzen CPUs include integrated Radeon graphics on the CPU die. So for example there are a lot of laptops that come with an NVIDIA graphics card, but also have a sort of "vestigial" Radeon in the CPU that is normally not used for anything.
In the past, Anukari just worked for users with this configuration, since when it detects multiple possible GPUs to use for the simulation, it would automatically select the CUDA one as the default. However in the 0.9.6 release, Anukari began crashing instantly at startup for these users.
This was pretty confusing, because I have comprehensive fuzz and golden tests that exercise all the physics backends (CUDA, OpenCL, Metal). These tests abuse the simulation to an extreme extent, and I run them under various debugging/lint tools to make sure that there are no GPU memory errors, etc. And across my NVIDIA, macOS, and Intel Iris chips, they all work perfectly.
Luckily I had a user who was extremely generous with their time to help me debug the issue. I sent them instrumented Anukari binaries, and eventually was able to pinpoint that it was crashing inside the clBuildProgram() call.
Now, you might think that what I mean is that clBuildProgram() was returning an error code, and I was somehow not handling it. No, Anukari is extremely robust about error checking. I mean it was crashing inside the kernel and clBuildProgram() was not returning at all due to the process aborting. This is with perfectly valid arguments to the function. So, obviously, this is a horrible bug in the AMD drivers. Even if the textual content of the kernel has e.g. a syntax error, clearly clBuildProgram() should return an error code rather than crash.
The really fun part is that I've only seen this crash on the hardware identifying as gfx90c. On other Radeons, this does not happen (though some of them fail in other ways). This is what I mean about the AMD drivers being extremely inconsistent.
Now, as to why this crash happened at startup, it's because during device discovery Anukari was compiling the physics kernel, and any device where compilation failed would be assumed incompatible and omitted from the list of possible backends. I added this feature after encountering other broken OpenCL implementations like the Microsoft OpenCL™, OpenGL®, and Vulkan® Compatibility Pack which is an absolute disaster.
So the workaround for now is that Anukari no longer does a test compilation to detect bad backends. This resolves the issue, although if the user manually chooses the Radeon backend on gfx90c it will unrecoverably crash Anukari.
Longer-term, given the Radeon driver bugs, I doubt I'll ever be able to fully support gfx90c, but I ordered a cheap used laptop off eBay with that chip in it so that I can at least narrow down what OpenCL code is causing the driver to crash. I know that it's something the driver doesn't like about the OpenCL code because it did not always crash, and the only difference in the meantime has been some improvements to that code. Hopefully I can find a workaround to avoid the driver bug, but if not I might add a rule in Anukari to ignore all gfx90c chips.
(Side-note: actually the first used laptop with a gfx90c chip that I bought off eBay was bluescreening at boot, so I had to buy a second one. These inexpensive Radeon laptops are really bad.)
Not all hope is lost for Radeon support. I recently upgraded my main development machine, and the Ryzen CPU I bought has an on-die Radeon, and it works flawlessly with Anukari. So maybe what I will be able to do one day is create an allow-list for Radeon devices that work correctly without driver issues. Sigh. It is so much easier with NVIDIA and Apple.
Parameter Randomization
Unlike the features above, this one hasn't been released yet, but I recently completed work to allow parameters to be randomized.
For Anukari this turned out to be a bit of a design challenge, since the sliders that are used to edit parameters are a bit complex already. The tricky bit is that if the user has a bunch of entities selected, the slider edits them all. And if the parameter values for each entity vary, the slider turns into a "range editor" which can stretch/squeeze/slide the range of values.
So the randomize button needs to handle both the "every selected object has the same parameter value" and "the parameter varies" scenarios. For the first scenario with a singleton value, it's simple: pressing the button just picks a random value across the full range of the parameter and assigns it to all the objects.
But for the "range editor" scenario, what you really want is for the randomize button to pick different random values for each entity, within the range that you have chosen. There's one tricky issue here, which is that it is very normal for the user to want to mash the randomize button repeatedly until they get a result they like. This will result in the range of values shrinking each time (since it's very unlikely that the new random values will have the same range as before, and the range can only be smaller)!
So the slider needs to remember the original range when the user started mashing the randomize button, and to reuse that original range for each randomization. This allows button mashing without having the range shrink to nothing. It's important, though, that this remembered range is forgotten when the user adjusts the slider manually, so that they can choose a new range to randomize within.
Another kind of weird case is when the slider is currently in singleton mode, meaning that all the entities have the same parameter value, and the user wants to spread them out randomly over a range. This could be done by deselecting the group of entities, selecting just one of them, changing its value, then reselecting the whole group, which would put the slider into range mode. But that's awfully annoying.
I ended up adding a feature where you can now right click on a singleton slider, and it will automatically be split into a range slider. The lower/upper values for the range will be just slightly below/above the singleton value, and the values will be randomly distributed inside that range. So now you can just right click to split, adjust the range, and mash the randomize button.
Demo mode, first-launch flow, and more
Captain's Log: Stardate 78738
In my last update I wrote about how I had gotten the website mostly ready for accepting payments for the public Beta. Since then, I have spent most of my time working on Anukari itself.
Demo mode
Anukari now has a working free demo mode. When there's no valid paid license, it operates normally with all features available, except that periodically the output sound is significantly ducked and some white noise plays, so that you can try everything out and hear how things sound, but can't really use it for anything productive.
Originally I started with just adding periodic white noise, but what I found was that on different speaker configurations, the same level of white noise varied from "not that motivating" to "shockingly loud." When Jason first tested the demo mode, the white noise was so loud that it startled him. That's no good! So the new mechanism where the gain on the plugin output is ducked is much better. The white noise can be a lot quieter in an absolute sense white still being loud relative to the plugin signal.
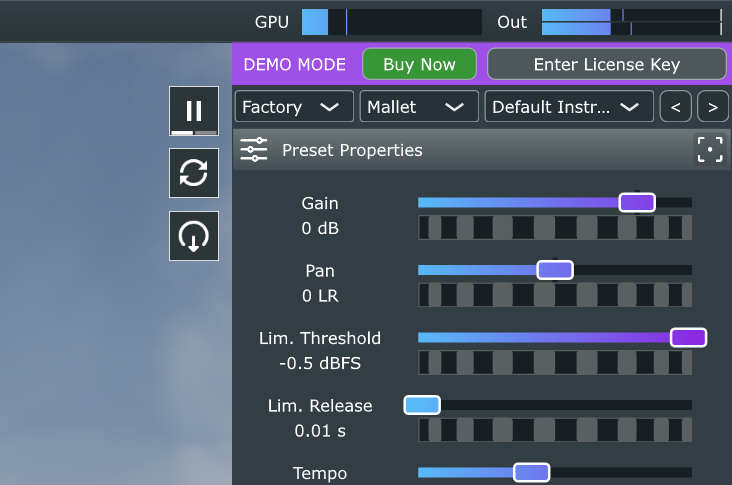
In addition to the periodic noise, the demo mode shows a little "DEMO MODE" panel with a "buy now" button and a button to register if you already have a product key. This panel pulses brightly during the white noise periods, to hopefully make it super clear that the noise is related to the demo mode, and the plugin's not just broken or something.
First-launch flow
For users that have paid for Anukari, I don't want them to always have to go through the free demo mode to unlock it, which seems mildly annoying to me. So I added a first-launch dialog flow where you can choose to launch the free demo, or you can just directly enter your product key and skip that.
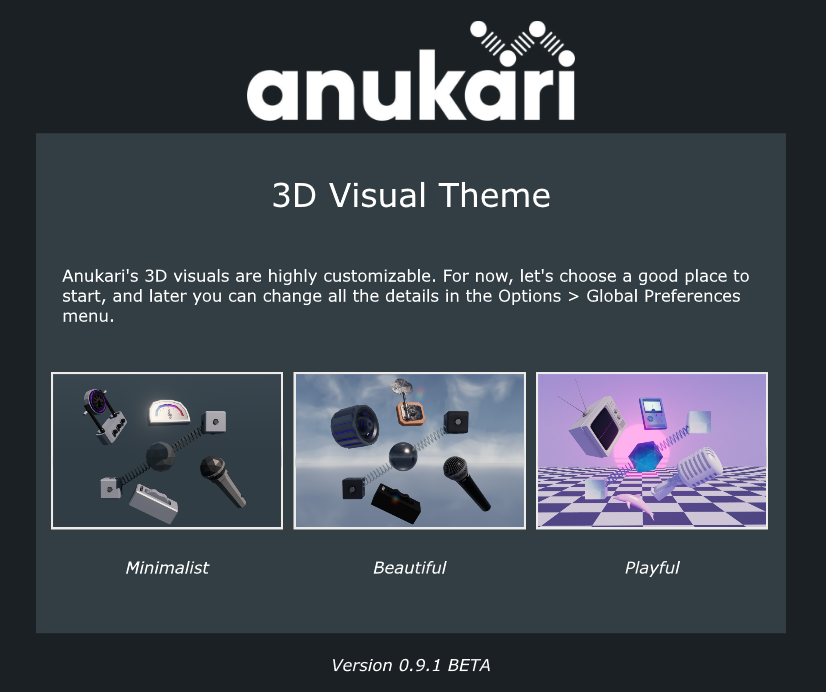
I've wanted this flow for a long time, since it does some other nice things. One really important part is that it prompts you to pick an initial 3D visual theme. Our 3D artist, Amfivolia, made a ton of cool skins and skyboxes, and we were debating what the best default was. I came to the conclusion that this is not a one-size-fits-all scenario, and the best thing is to let the user pick the starting skin. This also serves to let the user know that the 3D graphics can be customized, which might not be otherwise obvious.
Preset chooser
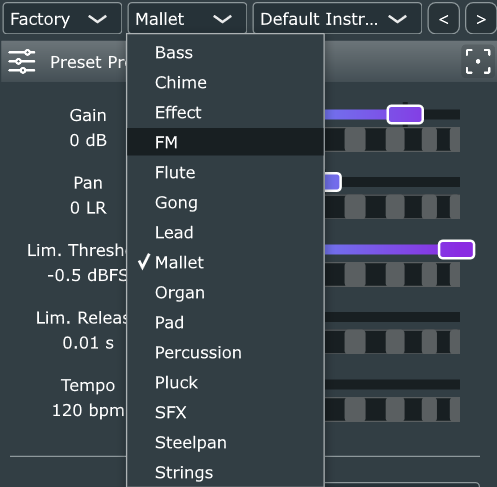
Jason has been working to create a bunch more presets, and at this point he's as much of a power user as I am. He brought to my attention how annoying it was to audition presets by going to File > Open > Factory > click for each preset, and he also pointed out that the lack of folders for organization was a pain. He suggested adding a simple preset chooser widget.
I was a bit reluctant to add any feature with the Beta so close, but I decided to hack together a quick version of the chooser, and immediately I realized that it was very worth including this as a feature in the Beta. It makes it dramatically easier to try a bunch of presets, which is exactly what I want people to do for the free demo.
I've spent a lot of effort over the last couple of years to make Anukari load really quickly, both at cold start, and when opening presets. And all that work paid off when I first started mashing the "next preset" button -- cycling through presets is virtually instantaneous, even for huge, complex ones. It is really satisfying.
Preset properties in the accordion
Another thing that Jason pointed out was that the "Options > Preset properties" menu was a little bit buried. This menu contains the settings for the polyphonic instancing mode, global pitch controls, MPE settings, etc, and it was pretty hard to discover. And despite the name of the menu, it was still a little unclear that it was preset-specific.
Again, I was hesitant to slow down the Beta by changing this, but the fix I had in mind involved some noticeable visual changes, and Jason is working on tutorial videos as well as screenshots for the user manual, etc, and especially for the videos I wanted to get any big layout changes done so that the videos aren't out of date immediately.
The big improvement here was something I'd wanted to do for a long time but was never certain about until now: I moved the "Master" panel with master gain, etc, which used to be a fixed rectangle in the lower right of the window, into the property-editor accordion. So instead of a fixed box taking up a bunch of valuable pixels, the Master panel is now a "Preset Properties" panel that can be fully-collapsed.
This has two major advantages:
-
Since the Preset Properties panel is in the accordion, it can now scroll, and so the stuff that was formerly buried under "Options > Preset preferences" is now directly available from the main screen.
-
The Preset Properties panel can be hidden completely, and thus the entire vertical real estate on the right-hand side can be opened up for editing other objects. Especially for objects with a lot of properties, like Mics or Oscillators, having all this space available to see the properties is really nice.
What's left for the Beta?
The website and Anukari itself are both pretty much ready for the Beta. There are a couple of small bugs I want to resolve, but nothing big.
So now the remaining pieces are mostly non-engineering details. Jason is going to finalize the new factory presets, which should bring us close to shipping with 200 presets. He's also working on tutorial videos and a first-time walkthrough video.
And I am starting to work on the Beta launch video for YouTube. My plan is to make something similar to the original "Introducing Anukari" video from 2023, but updated to announce the Beta, and show off all the stuff that Anukari is capable of now.
So... we're getting close. :)


 The Audio Units logo and the Audio Units symbol are trademarks of Apple Computer, Inc.
 VST is a trademark of Steinberg Media Technologies GmbH, registered in Europe and other countries.