- If I buy the Beta version, do I get version 1 when it comes out?
- Why is Anukari is making random bursts of white noise?
- What DAWs does Anukari work with?
- Does Anukari work in Rosetta mode?
- What can I do if Anukari is crashing?
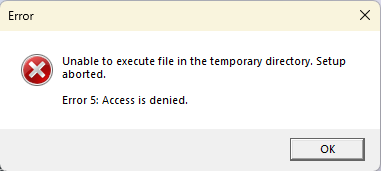
- [Windows] Installation fails with 'Unable to execute file in temporary directory' error
- [Advanced] How do I create a custom environment (skybox)?
- [Advanced] How do I create a custom skin (3D models)?
- [Advanced] Can I create a .ank preset programmatically (e.g. with Python)?
If I buy the Beta version, do I get version 1 when it comes out?
Yes, the paid license for the Beta version of Anukari entitles you to a full version 1 copy of Anukari when it is released.
Why is Anukari is making random bursts of white noise?
This is likely because Anukari is running in free demo mode. If this is happening after you already activated the full version, it is possible that an OS system update has made your device look different to Anukari's license key system. You can solve this by re-entering your license key into Anukari to activate the full version. Or, if you do not yet have a license key, you can buy one here.
What DAWs does Anukari work with?
Anukari has been tested and works well in the DAWs listed below. It probably works well in other DAWs, too, but if a DAW is not listed here, we haven't yet tested it ourselves.
| DAW | Notes (if any) |
|---|---|
| Ableton | |
| Audacity | Anukari works well in Audacity, but note that when playback is stopped, Audacity will not output the audio from Anukari, which can make it difficult to edit presets. |
| AVID Pro Tools | |
| Bitwig | |
| Cakewalk | |
| Cubase 14 | |
| Entonal | |
| FL Studio | |
| GarageBand | |
| Gig Performer 5 | |
| Logic Pro | |
| Magix Sequoia Pro | |
| MuLab 9 | |
| PreSonus Studio One | |
| Reason | |
| Reaper | |
| Renoise | |
| Waveform 13 |
Does Anukari work in Rosetta mode?
Yes, on Apple Silicon Macs, if you are using Rosetta to run an old version of your DAW that does not yet support Apple Silicon (such as Ableton Live 10), Anukari will work as a VST or AudioUnit plugin.
However, be aware that performance will suffer somewhat in Rosetta mode.The Rosetta translation system is not nearly as fast as running in native Apple Silicon mode. So upgrading your DAW to a version that can run natively on Apple Silicon is strongly recommended to get the best performance out of Anukari.
What can I do if Anukari is crashing?
The first thing to do if you're experiencing crashes problems is to make sure your graphics card drivers are up-to-date. Especially if you have integrated Intel or AMD Radeon graphics, this is very likely to fix the problem.
On Windows, you should update your graphics card drivers to the latest version offered on the manufacturer's website. This version is usually much newer than what comes built-in with Windows.
NOTE: The driver software links below are not affiliated with Anukari in any way and are provided only for your convenience.
On macOS, the only way to update your graphics card drivers is to upgrade to a newer macOS version to the latest available. We know that upgrading your macOS version can be a pain, so this may not always be a good option, but it may help.
As a last resort, on Windows you can try forcing Anukari to use OpenGL instead of Vulkan. To do this, create a file in C:\Users\YOURNAME\Documents\Anukari with the (exact) name prefer-opengl.txt . The contents of the file do not matter; it can be empty. Then restart Anukari and it will use OpenGL. Some older Intel and AMD drivers have buggy Vulkan support and OpenGL may work better.
If none of this helps to solve the problem, please contact Anukari support.
[Windows] Installation fails with 'Unable to execute file in temporary directory' error
This error is usually caused by an overeager antivirus program that is blocking the Anukari installer from running. You can try temporarily disabling your antivirus software, and then running the installer again. After installation succeeds, you can re-enable your antivirus software.

[Advanced] How do I create a custom environment (skybox)?
NOTE: The Google Filament project is not associated with Anukari in any way. Use the Filament tools at your own risk.
An Anukari environment preset is a file with the extension .env.zip, which is a plain zip file that contains two required files (ibl.ktx, skybox.ktx) and one optional file (model.glb). The *.ktx files provide the texture and luminance data for the skybox, and the *.glb file provides a 3D model that will be rendered at 1:1 scale at the origin (see the Vaporwave.env.zip environment for an example). You can look at the Factory environments in the following directories:
- Windows: C:\ProgramData\Anukari\FactoryEnvironments
- MacOS: /Library/Application Support/Anukari/FactoryEnvironments
The *.ktx files can be generated from any *.hdr or *.exr image file in the equirectangular format. There are many websites that have free skyboxes in this format. To convert the *.hdr or *.exr image file into the *.ktx files that Anukari requires, you can use the free cmgen.exe tool from Google Filament. Download the latest Filament release for your OS and extract the files. In the extracted bin directory there will be an executable called cmgen.exe (Windows), or just cmgen (MacOS). To convert the skybox, the commands look like:
- Windows: .\bin\cmgen.exe --size 512 -f ktx -x C:\Users\<username>\Documents\Output C:\Users\<username>\Documents\input.exr
- MacOS: ./bin/cmgen --size 512 -f ktx -x ~/Output ~/input.exr
The --size parameter can be used to increase the quality of the skybox, at the expense of larger files. It has to be a power of 2 like 512, 1024, or 2048. Generally 2048 produces very large files with very good quality. The cmgen command will produce two *.ktx files in the Output directory, which you need to rename to exactly ibl.ktx and skybox.ktx. Zip these up and rename the zip file to *.env.zip and then place it in the appropriate UserEnvironments directory, and you'll then be able to load it in Anukari. Make sure the *.ktx files are at the top-level of the *.zip file with no subdirectories:
- Windows: C:\Users\<username>\Documents\Anukari\UserEnvironments
- MacOS: /Users/<username>/Documents/Anukari/UserEnvironments
To include a custom model.glb file, see the section below on how to create *.glb files, and then give the file that exact name and include it in the *.env.zip file that you create.
[Advanced] How do I create a custom skin (3D models)?
NOTE: The Blender and gltfpack projects are not associated with Anukari in any way. Use these tools at your own risk.
An Anukari skin preset is a file with the extension .skin.zip, which is a plain zip file that contains all of the 3D model files that Anukari needs in the open glTF 2.0 format. Specifically, the files are in the *.glb binary format. To see a list of all the *.glb files that are required, you can look at the Factory skins in the following directories:
- Windows: C:\ProgramData\Anukari\FactorySkins
- MacOS: /Library/Application Support/Anukari/FactorySkins
There are many tools you can use to edit the *.glb files, but the simplest starting point is the free Blender tool. Technically you can import the *.glb files directly into Blender via the File > Import > glTF 2.0 menu, but most of Anukari's *.glb files have been compressed using EXT_meshopt_compression which Blender does not yet support. If you really want to import the *.glb, you can do it by using a tool like gltfpack to output the *.glb in a non-compressed format, which you can then import into Blender.
However a much simpler place to start would be with the actual *.blend source files for one of the Factory presets, which have been made available for the Pre-Alpha Classic skin here. This simple skin has everything you need to get started. Be sure to carefully examine the orientation and scale of the 3D models, and note that Anukari's renderer is limited to simple PBR materials. Also, look carefully at the animation timelines. All the animations are done from t=0 to t=1, but some of them (like the oscillator or bow) require that the animation loops, while others (like the mallet) do not.
Once you've made a 3D model, you can export it via Blender's File > Export > glTF 2.0 menu. Be sure to choose the glTF Binary (.glb) output format, and give the skin the right filename for the object it is associated with. Finally, zip up all your *.glb files, making sure that they are at the top-level directory with no nested directories, and rename the zip file to *.skin.zip. Place that file in the appropriate UserSkins directory and then you can load it in Anukari:
- Windows: C:\Users\<username>\Documents\Anukari\UserSkins
- MacOS: /Users/<username>/Documents/Anukari/UserSkins
Note that Anukari does NOT support all valid glTF 2.0 files. If Anukari is unable to load your model, it will render it as a pink cube. In some cases, Anukari may be able to log information about why it could not load your model. Log files are in these directories:
- Windows: C:\Users\<username>\AppData\Roaming\Anukari\logs
- MacOS: /Users/<username>/Library/Logs/Anukari/logs
If your 3D models take a long time to load, or are very large, you can consider using the gltfpack tool to compress the vertices using the -cc option. This can substantially reduce the file sizes and speed up loading.
[Advanced] Can I create a .ank preset programmatically (e.g. with Python)?
Yes! Anukari *.ank preset files are represented as Google Protocol Buffers, and the public definitions for those protobufs are available in the anukari-preset-api Github repo. These definitions can be used to programmatically create Anukari presets in any language that supports Protocol Buffers, such as Python.
However, the raw Protocol Buffers are quite difficult to work with, though, so we strongly recommend using the anukaribuilder library by 312ears instead.This library provides a much more user-friendly API for creating presets, along with a bunch of examples, including some extremely fun stuff like a preset that morphs between a sphere and a pyramid.


 The Audio Units logo and the Audio Units symbol are trademarks of Apple Computer, Inc.
 VST is a trademark of Steinberg Media Technologies GmbH, registered in Europe and other countries.